
If you have been following my blogs for a while, you already know that I have a special place in my heart for event-driven architecture. There is just something elegant about letting events do the heavy lifting for you!
Especially when utilizing modern approaches in Azure like Azure Functions, Azure Servicebus and my personal favorite “PowerShell” 🥰things really start to come together and form a platform instead of just standalone components.
In this post, we’re diving into something a little bit more custom than the previous approach I’ve shown with EventGrid. We’ll be building a simple, event-driven “send -> response” mechanism using Azure Functions, PowerShell and Azure Service Bus.
Also, in this blog, you’ll find the ‘Deploy to Azure’ button deploying a basic Azure Function for you!
During this post, you’ll see this icon 🎬 which indicates that action is required so you get the full benefit out of this post.
And I’ve introduced the 📒 which indicates that the subsequent part explains the technical details in the context of this post.
Let’s get started!
Some things explained
Before diving into all technical details let’s explain some things which we’ll be using in this post.
Azure Service Bus
Azure Service Bus is a fully managed message broker from Microsoft Azure. It’s designed to connect different applications, services, and systems, even when they’re not online at the same time. Think of it as a post office 📨 that handles reliable message delivery between senders and receivers, without either needing to know anything about each other directly.
Queues vs Topics
Let’s talk about one of the classic questions when working with Azure Service Bus: what’s the difference between queues and topics? 🤔
Imagine you’re running a coffee shop ☕️.
Queues – One line, one barista
A queue is like a single line of customers waiting to order from one barista. Each customer (message) waits their turn. The first one in line gets served first (FIFO: First-In-First-Out), and once the order is taken, that customer leaves the queue. No one else gets that same order, it was meant for that one barista (or function) only.
This is great for point-to-point communication. One sender, one receiver. Nice and clean!
📒 Use queues when you want one consumer to process each message.
Topics – One announcement, multiple listeners
Now, a topic is more like making an announcement over the shop’s announcement system 🎤 “Free croissants at the counter!” 🥐
Everyone in the shop hears it, but only the people who’ve signed up for “Free Food Alerts” (subscribers) will jump up to claim theirs. Each person who’s subscribed can act on that same message independently. Some might ignore it, some might react, but the message was sent once and handled by many.
This is perfect for publish/subscribe scenarios where one sender wants to notify multiple, potentially different, receivers.
📒 Use topics when multiple consumers need to react to the same message, each in their own way.
So to summarize things:
- Queue = single path, one consumer.
- Topic = broadcast with multiple tailored subscriptions.
Prepare the deployment
You can choose as promised 😉 to use the ‘Let me deploy it for you’ functionality. Or deploy everything on your own. No worries I’ll provide the code for the business logic on the way.
Deploy on your own:
If you want to deploy all resources on your own, make sure these get deployed:
- Storage account
- Function App (PowerShell 7.4 runtime)
- App Service Plan
- Service Bus NameSpace
- Also add a queue!
You should end up with something like below:

Let me deploy it for you:
Let me deploy it for you! 😉 Click the button below to deploy everything you need to get started!
Azure Function
In this setup, the Azure Function will be the real workhorse! it’s the one actually executing our business logic.
We’ll configure it so that it listens to messages from the Azure Service Bus. Once a message arrives, the Azure Function gets triggered and takes over from there. This is where your logic lives, processing data, calling APIs, triggering other systems… whatever your use case demands!
Think of it like this:
The Service Bus is the messenger 🧾 delivering a sealed envelope (message), and the Azure Function is the person opening that envelope and taking action based on what’s inside. 🎯
So, while the Service Bus handles the transportation and delivery, the Azure Function is where the decision-making and actual processing happen.
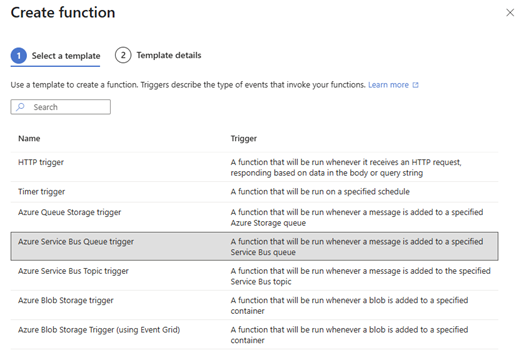
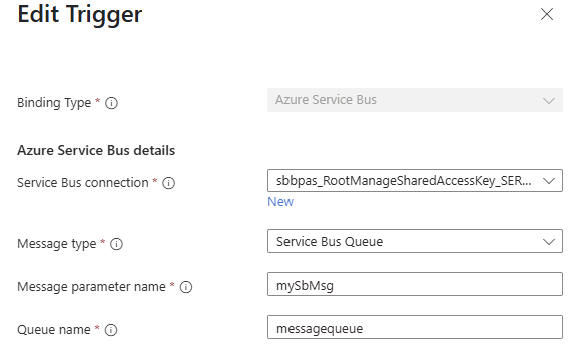
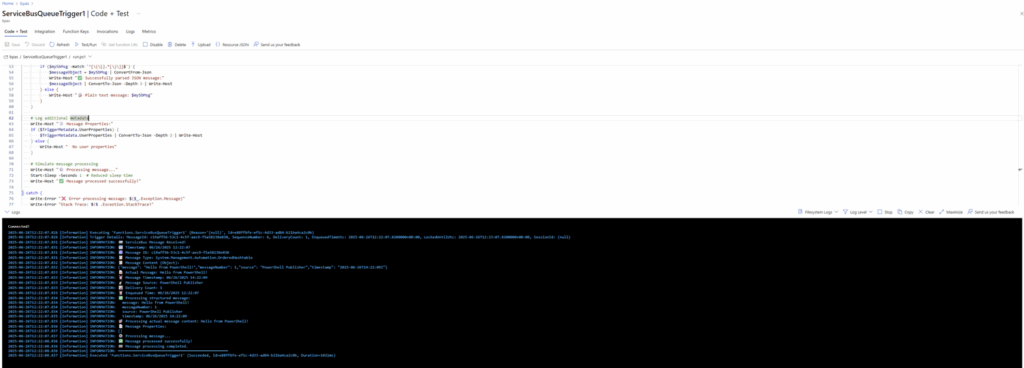
🎬 Modify the Azure function as the steps describe below
- Create a new Azure Function in the Function App with the “Azure Service Bus Queue Trigger”
- Make a new ServiceBus connection and point it to your Service Bus
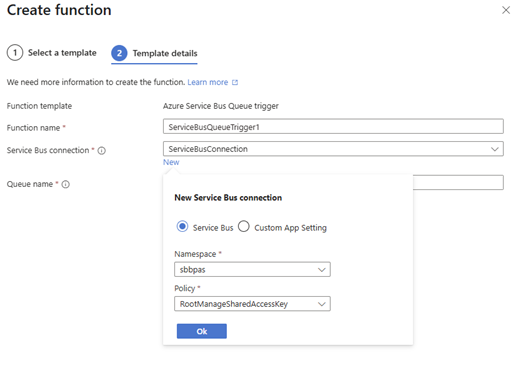
- 📒 Don’t forget to put the right queue name in there! Otherwise our messages won’t reach their destination!
- Now add the code below to the function
using namespace System.Net

param($mySbMsg, $TriggerMetadata)

Write-Host "🚌 ServiceBus Message Received!"
Write-Host "📅 Timestamp: $(Get-Date)"
Write-Host "🆔 Message ID: $($TriggerMetadata.MessageId)"

Write-Host "📋 Message Type: $($mySbMsg.GetType().FullName)"

if ($mySbMsg -is [hashtable] -or $mySbMsg -is [System.Collections.Specialized.OrderedDictionary]) {
    Write-Host "📋 Message Content (Object):"
    $mySbMsg | ConvertTo-Json -Depth 3 | Write-Host

    if ($mySbMsg.message) {
        Write-Host "📝 Actual Message: $($mySbMsg.message)"
    }
    if ($mySbMsg.timestamp) {
        Write-Host "⏰ Message Timestamp: $($mySbMsg.timestamp)"
    }
    if ($mySbMsg.source) {
        Write-Host "📡 Message Source: $($mySbMsg.source)"
    }
} else {
    Write-Host "📋 Message Content (Raw): $mySbMsg"
}

Write-Host "📊 Delivery Count: $($TriggerMetadata.DeliveryCount)"
Write-Host "⏰ Enqueued Time: $($TriggerMetadata.EnqueuedTimeUtc)"

try {

    if ($mySbMsg -is [hashtable] -or $mySbMsg -is [System.Collections.Specialized.OrderedDictionary]) {
        Write-Host "✅ Processing structured message:"

        foreach ($key in $mySbMsg.Keys) {
            Write-Host "  $key`: $($mySbMsg[$key])"
        }

        if ($mySbMsg.message) {
            $actualMessage = $mySbMsg.message
            Write-Host "🎯 Processing actual message content: $actualMessage"
        }
    } else {
        if ($mySbMsg -match '^[\{\[].*[\}\]]$') {
            $messageObject = $mySbMsg | ConvertFrom-Json
            Write-Host "✅ Successfully parsed JSON message:"
            $messageObject | ConvertTo-Json -Depth 3 | Write-Host
        } else {
            Write-Host "📝 Plain text message: $mySbMsg"
        }
    }

    Write-Host "📄 Message Properties:"
    if ($TriggerMetadata.UserProperties) {
        $TriggerMetadata.UserProperties | ConvertTo-Json -Depth 2 | Write-Host
    } else {
        Write-Host "  No user properties"
    }


    Write-Host "⚙️ Processing message..."
    Start-Sleep -Seconds 1
    Write-Host "✅ Message processed successfully!"

} catch {
    Write-Error "❌ Error processing message: $($_.Exception.Message)"
    Write-Error "Stack Trace: $($_.Exception.StackTrace)"
    throw
}

Write-Host "🏁 Message processing completed."
Write-Host "━━━━━━━━━━━━━━━━━━━━━━━━━━━━━━━━━━━━━━━━━━━━━━━━━━━"📒 The service connection as mentioned above to the Service Bus is important! Missing any confiscations here will result in a non-working setup. If you forgot and need to modify you can do so on the integration page of the function as shown below
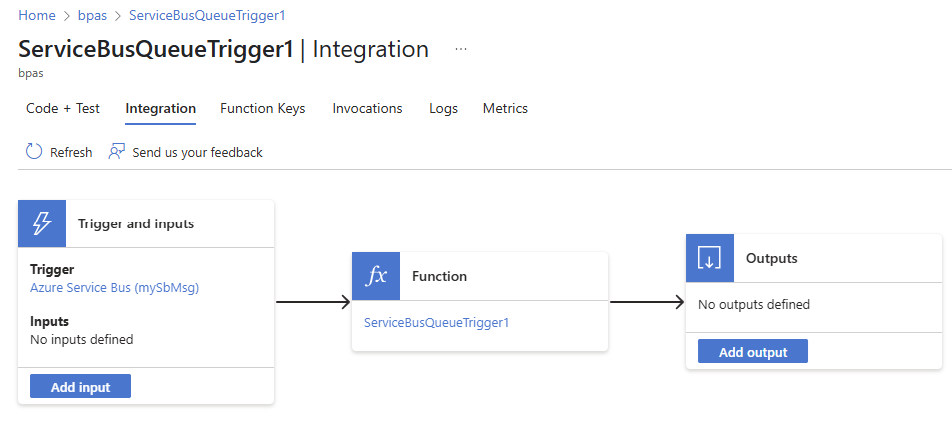
Eventually your trigger should look like something below (the queue name is different for each individual case if you haven’t used the ‘let me deploy it for you functionality’
Preparing our first message
Before we can send out our first message to the Service bus there are some variables which we need to know. The Service bus contains an endpoint, this endpoint is used for delivery systems so they know where to drop a message.
🎬 Find and note down the Service bus connection string. You can find it by going to the Service Bus on the ‘Shared access policies page’
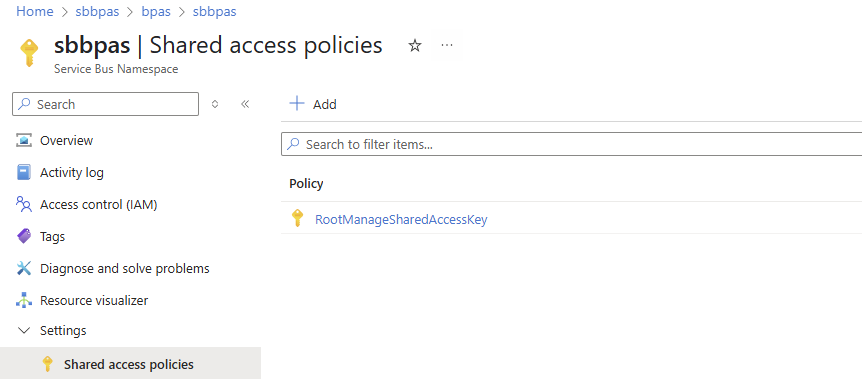
On the right you will see the connection string:
Copy the value of the primary connection string and store it 😉 the script I’ll provision for you needs it as input parameter.
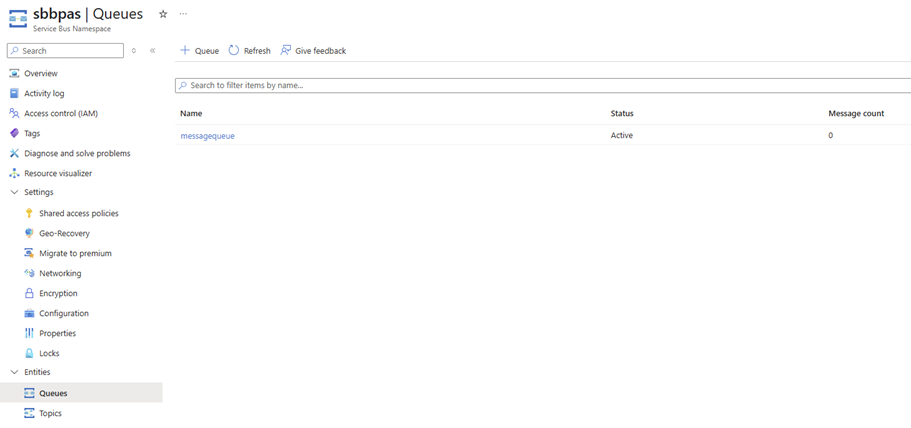
🎬 Also note down the name of the Service bus queue you’ve created. You can find it on the Service Bus underneath ‘queues’
Sending the first message
Now let’s run the script I’ve prepared for you.
🎬 Run the script below and supply it with the parameters from the step above where we gathered the connection string and the queue name.
using namespace System.Net

param([string] $mySbMsg, $TriggerMetadata)

Write-Host "🚌 ServiceBus Message Received!"
Write-Host "📅 Timestamp: $(Get-Date)"
Write-Host "🆔 Message ID: $($TriggerMetadata.MessageId)"
Write-Host "📋 Message Content: $mySbMsg"
Write-Host "📊 Delivery Count: $($TriggerMetadata.DeliveryCount)"
Write-Host "⏰ Enqueued Time: $($TriggerMetadata.EnqueuedTimeUtc)"

try {

    if ($mySbMsg -match '^[\{\[].*[\}\]]$') {
        $messageObject = $mySbMsg | ConvertFrom-Json
        Write-Host "✅ Successfully parsed JSON message:"
        $messageObject | ConvertTo-Json -Depth 3 | Write-Host
    } else {
        Write-Host "📝 Plain text message: $mySbMsg"
    }
    Write-Host "📄 Message Properties:"
    if ($TriggerMetadata.UserProperties) {
        $TriggerMetadata.UserProperties | ConvertTo-Json -Depth 2 | Write-Host
    }

    Write-Host "⚙️ Processing message..."
    Start-Sleep -Seconds 2
    Write-Host "✅ Message processed successfully!"

} catch {
    Write-Error "❌ Error processing message: $($_.Exception.Message)"
    Write-Error "Stack Trace: $($_.Exception.StackTrace)"
    throw
}

Write-Host "🏁 Message processing completed."
Write-Host "━━━━━━━━━━━━━━━━━━━━━━━━━━━━━━━━━━━━━━━━━━━━━━━━━━━" 👉 In my example I run it with:
.\Send-ServiceBusMessage.ps1 -ConnectionString “Endpoint=sb://sbbpas.servicebus.windows.net/;SharedAccessKeyName=RootManageSharedAccessKey;SharedAccessKey=xxxxxxxxxxxxxxxx” -QueueName messagequeue
I named it “Send-ServiceBusMessage.ps1”
Validating the message arrival
When the message is sent by the PowerShell script you can see on the Service bus landing page that the amount of messages increases (note; this does take some time to refresh)

You can even drop down in the queue to see the actual message (but make sure nothing is listening at the queue)
📒 If your function is already started and listening this message won’t be visible, It will immediately be delivered to the function and marked as ‘processed’ and will be removed from the bus.

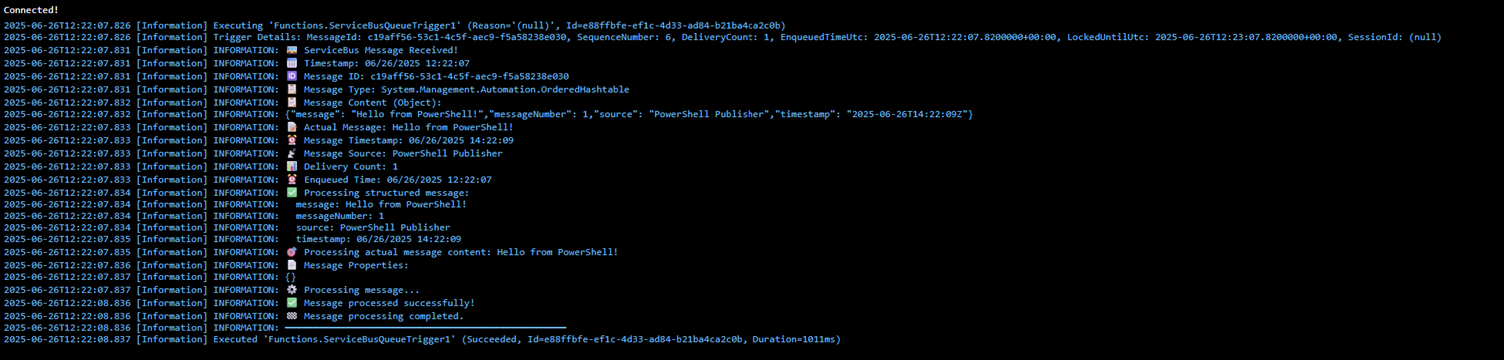
🎬 Now open the Azure Function and sent a new message by repeating the script
Your view should be as below. When the messages arrives at the Service bus the function will be triggered and the code is executed.
You can see all the message details which is printed by our code
Summary
That’s a wrap! 🎉
In this blog, we took a closer look at how to create a simple but powerful send → response event-driven mechanism using Azure Service Bus, Azure Functions, and of course… PowerShell 💙.
We started by laying the foundation, what Azure Service Bus is, how queues and topics differ (☕️ remember the barista vs. announcement system analogy?)
We built an Azure Function to act as our business logic engine, ready to jump into action as soon as a message lands in our queue.
We sent our first message using PowerShell and watched as everything came together ✨.
And finally, we saw it all in action: message sent → message received → business logic executed.
📒 This post is all about combining the right Azure tools to build clean, scalable, event-driven platforms without overcomplicating things!
🎬 If you followed along step-by-step, you now have a working solution that you can expand, extend, or plug into a larger architecture.
Thanks again for reading! I hope this post inspires you to explore more creative ways to use Azure Functions, Service Bus, and PowerShell together. Let me know what you’ll build next! 🚀