
Yeah, we all know this right “STOP DOING THIS”, “STOP DOING THAT!” Yeah… that’s nice, but now what?!
When you are already in the PowerShell field for some time and have created some scripts you might have been running into this topic; ‘How to deal with secrets’. There are of course solutions like KeyVault, SecureString and secret providers with API’s which help you to store the secrets you have in a secure environment.
Things like this might look familiar;
$password = "P@ssw0rd123!"
$apiKey = "sk-1234567890abcdef"
$connectionString = "Server=myserver;Database=mydb;User=admin;Password=SuperSecret123;"But what if I told you there’s a better way? A way that’s:
✅ Secure by default
✅ Cross-platform (Windows, Linux, macOS)
✅ Works with multiple backends (local, Azure Key Vault, HashiCorp Vault)
✅ Standardized across your entire team
✅ Built right into PowerShell 7+ (with some extra module support 😉)
That way forward is called ‘PowerShell SecretManagement”!
Enough with the ‘now what’ … let’s fix it!
🎬 See this one? Time to stop relaxing and get your hands dirty!
📒 This one? Well, this one is there for highlighting things to you. Whether I believe extra information is required about a section, I’ll post it here.
What is SecretManagement?
Think of PowerShell SecretManagement as the universal remote control for your secrets. With this remote control you can handle credentials for different systems while you just get one unified interface.
It doesn’t matter if that secret is stored:
- In your local machine
- In an Azure KeyVault
- In HashiCorp Vault
- In KeePass, LastPass etc.
The mindset remains the same ‘One remote control, to control them all’. The architecture behind it looks a bit like below;
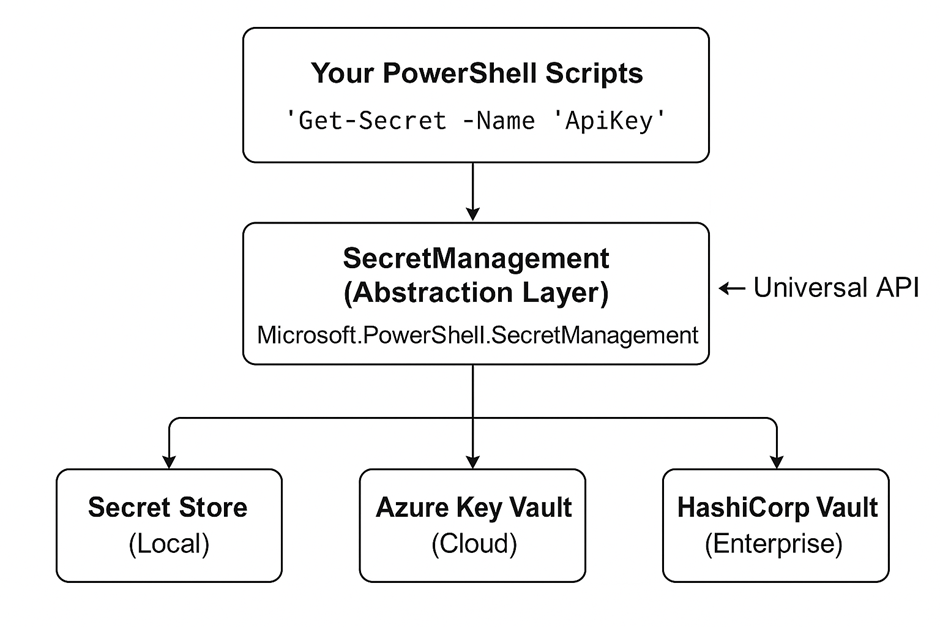
💡 Explaination:
SecretManagement “The interface where you code against”
SecretStore “The default storage where your secrets live”
Getting Started
📒 This blog is focusing on PowerShell 7. Older versions I haven’t checked out so there might be non-functionals there.
🎬Let’s get started!
- Start PowerShell 7+ and run the code below
Install-Module Microsoft.PowerShell.SecretManagement -Repository PSGallery -Force- Install the default vault (local machine vault)
Install-Module Microsoft.PowerShell.SecretStore -Repository PSGallery -ForceNow we have the required modules installed form the PowerShell Gallery it’s time to create our first vault.
🎬Follow the steps below to create your first local vault
- Run the code below to create your first local vault
Register-SecretVault -name "LocalTestVault"It will ask you for the module. Enter the name “Microsoft.PowerShell.SecretStore”. (If you want you can also specify this value directly in the CMDLet by specifying the -ModuleName parameter.
You should end up with something like below:

- Now check if the vault is there by running the command below
Get-Secret vault You should end up with something like below

🎉 Succes, we have our first vault ready 😉
💡If you are moving towards more production systems with shared access use the ‘-Authentication Password’ to require a password on the vault. For testing and dev environments as I’m showing you right now the ‘-Authentication None’ is super convenient!
📒 If you want to set a password on your vault you should run the command below
Set-SecretStoreConfiguration -Scope CurrentUser -Authentication PasswordFirst secrets
Now we have the vault set-up it’s time to add some content to it.
🎬 Follow the steps below to create the first secret in the vault
- Run the command below to create the first secret
Set-Secret -Name "TestSecret" -Secret "SuperDuperSecureSecretString"📒 If you haven’t specified the password it will now ask for one!
You should end up with something like below;

Getting the first secret
If you now want to get the secret we just created you can run the steps below to get it.
🎬 Follow the steps below to get the first secret from the vault
- Run the command below to get the secret
Get-Secret -Name TestSecret This will give you a securestring object which you can use for authentication purposes. If you want you can also get the secret value as plain text. For that you can run the command below;
Get-Secret -Name TestSecret -AsPlainTextWhich all results in the example below;

Storing complex configurations
You can even store complex configurations in the vault so you don’t only have to stick with plain string formats. This helps you to create secure configurations which you can store and fetch directly from the vault.
🎬Follow the steps below to create a first complex configuration for the vault
- Run the code below
$apiConfig = @{
    ApiKey = "sk-abc123xyz"
    Endpoint = "https://api.example.com"
    Region = "westeurope"
} | ConvertTo-Json

Set-Secret -Name "APIConfig" -Secret $apiConfigIf you now fetch it with the command below
Get-secret -name "APIConfig" -AsPlainTextYou should end up with:

Listing all secrets
If you want to get a good overview of all secrets in the vault you can simply run the get-secret and list it that way. The only inconvenient part is that it’s difficult to read and to get a good overview on all secrets which are available in your secret store.
🎬 Run the command below to get a better overview of all secrets in your vault
Get-SecretInfo | Format-Table Name, Type, VaultNameYou should get something like below;

Changing secrets
Sometimes things change, and so should your secrets! Maybe your API key got rotated, your password expired, or you simply want to update your stored value to keep things fresh and secure. The good news? With PowerShell SecretManagement, you don’t need to jump through hoops or recreate your vault from scratch. You can easily update existing secrets in just a few lines of code, ensuring your configurations always stay up to date and your scripts continue running smoothly.
🎬Run the command below to change a secret value
Set-Secret -Name "TestSecret" -Secret "BlaBlaBLaNewSecret" -NoClobber:$falseYou should end up with something below;

Deleting secrets
Not every secret deserves to live forever. Whether you’ve replaced it with a new one, retired an old application, or just want to tidy up your vault, deleting secrets is a simple and safe process. Keeping your vault clean and relevant helps prevent confusion and potential misuse of outdated credentials.
🎬Run the command below to delete a secret
Remove-Secret -Name "TestSecret” If you now list the secrets again you’ll see that the secret is deleted.

Summary
In this post we tackled one of the most common PowerShell pitfalls, hardcoding secrets 😬
Instead of leaving passwords, API keys, and connection strings scattered through your scripts, we explored a much smarter and safer approach: PowerShell SecretManagement 🔐
From there:
🎬 We installed and configured the SecretManagement and SecretStore modules from the PowerShell Gallery.
✅ Created our first local vault and securely stored our secrets.
📦 Retrieved them easily using Get-Secret, both as secure strings and plain text.
🧩 Stored complex configurations (like API settings) directly in the vault.
📋 Listed all available secrets for better visibility.
🔄 Updated existing secrets effortlessly without recreating the vault.
🧹 Cleaned up and deleted secrets we no longer needed.
With just a few simple cmdlets, we built a foundation for secure, standardized, and cross-platform secret handling, all inside PowerShell 7+.
This approach is perfect for:
- Developers tired of hardcoded credentials
- Teams looking for consistent secret handling across systems
- Automation scenarios where security shouldn’t slow you down
No more copy-pasting passwords or juggling vault APIs, just clean, secure, PowerShell-native secret management ✨
Now you’ve got the tools to ditch the “walk of shame” and manage your secrets like a pro. Go on, rotate, fetch, and secure responsibly 😉
Oh, and don’t forget, have some fun while doing so! 😉