

Welcome to this next blog, where I’ll guide you through the magnificent world of testing!
In my previous blog posts, I showed you how to step up your scripting game—diving into object-oriented scripting, enhancing your functions, developing modules, and adding comments to keep everything maintainable.
Although testing isn’t exactly the most exciting topic in our industry, it’s still a crucial one. In this blog, I’ll do my best to get you more enthusiastic about writing tests! 😉
And of course, since we’re ‘techies,’ all our testing will be done through code as well!
Enough talking—let’s get started!
Testing & mocking
When testing code, we often write tests called ‘unit tests’ and ‘integration tests.’ These tests help validate your script’s output by comparing it to predefined cases to see if the result matches the expected outcome.
To give you a better understanding, I’ve outlined the differences between these two types of tests below:
- Unit test – Focuses on testing small, individual parts of the code, such as functions or methods, in isolation. These tests check whether a specific piece of code produces the expected output given a certain input. They help catch bugs early and ensure each component works correctly on its own.
- Integration test – Focuses on how different parts of the code work together. Instead of just testing a single function, these tests validate interactions between modules, services, databases, etc., to ensure everything integrates correctly. They help identify issues that might not appear when testing individual components separately (as unit tests do).
Both of these tests play a crucial role in covering the most important parts of your code!
Another essential technique in testing is mocking. Mocking helps replace real objects or dependencies with ‘fake’ ones, allowing you to isolate parts of your code and avoid relying on external systems like databases, APIs, or third-party services.
For example, if your code fetches data from an API, you can use a mock to return predefined data instead of making an actual API call. This makes tests faster, more reliable, and independent of external factors.
💡 The name ‘Mocking’ already tells a bit about what it does ‘it mocks you’ basically given you an object or a result which is generated but does represent an expected outcome.
Using a framework
In this part, I’ll show you how to utilize Pester, a unit testing and integration testing framework for PowerShell. Pester helps you write the tests mentioned above, making it easier to validate your code and catch potential issues early.
You can find the information about Pester on their site; https://pester.dev/
Installing
First lets make sure you have Pester installed on your system. You can run the command below to install it:
Install-Module Pester -Force💡 if you already have Pester installed from a previous installation you might run into a publisher conflict mentioning that the certificate chain is different. If so install Pester with the command “Install-Module Pester -Force -SkipPublisherCheck”
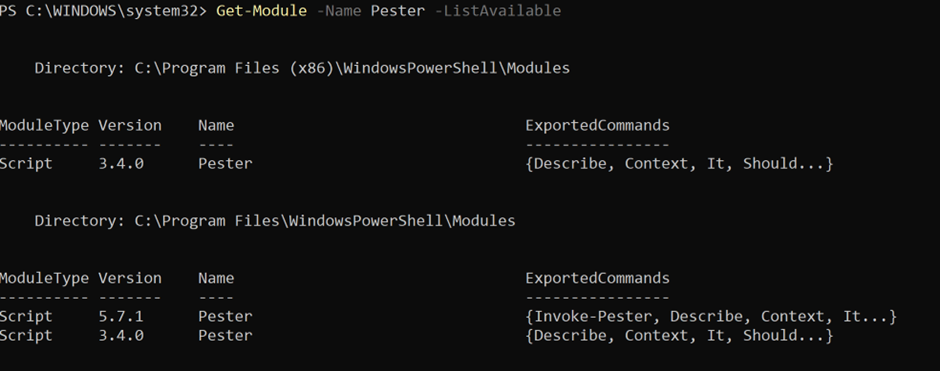
After the installation is done we can validate it by checking the installation
Get-Module -Name Pester -ListAvailableWhich should give you the actual result:
Creating the first unit test
Before creating your first unit test it’s important to also have some code to test 😉To help you out with that I’ve created some example code below which you can utilize during this training. ⬇️
class User {
    [string] $Name
    [string] $Email
    [string] $Phone

    User([string] $Name, [string] $Email, [string] $Phone) {
        $this.Name = $Name
        $this.Email = $Email
        $this.Phone = $Phone
    }

    [string] ToString() {
        return "Name: $($this.Name), Email: $($this.Email), Phone: $($this.Phone)"
    }
}

class UserManagement {

    [User[]] $Users

    UserManagement() {
        $this.Users = @()

        $this.Users += [User]::new("John Doe", "john.doe@bartpasmans.tech", "123456789")
        $this.Users += [User]::new("Jane Doe", "jane.doe@bartpasmans.tech", "987654321")
    }
}
⚠️ Save this as a module! Not sure how to do this? Check my previous posts in the series “Scripting like a pro!”
Create this file in your working directory in a subfolder ‘modules’. And next to that create also a file in the root directory called ‘usermanagement.Tests.ps1”
Your directory structure in the end should look like

Now enter the first test in the usermanagent.tests.ps1 file. You can use the code below as for your first test
using module './Modules/UserManagement'

BeforeAll {
    #This is the place where before we are going to run the tests we will do some pre-test configuration
    #As the code we want to test is in a separate file we first need to load it
    Import-Module ".\Modules\UserManagement" -Force
}

Describe 'User Class Tests' { #Here we are going to define what this test is going to do

    Context 'User Class Constructor' { #Then within the test we are going to define the context of the test
        It 'Should create a new user' { #And finally we are going to define the test itself

            $name = "Bart Pasmans";
            $email = "info@bartpasmans.tech";
            $phone = "123456789";

            #Act
            $user = [User]::new($name, $email, $phone);

            #Asserts
            $user.GetType().Name | Should -Be 'User'

            $user.Name | Should -be $name;
            $user.Email | Should -be $email;
            $user.Phone | Should -be $phone;
        }
    }
}
Tests explained
In our first test, we encountered a few new concepts. Let’s dive into them and explain why they are used this way.
using module ‘./Modules/UserManagement’ – Since the code we’re testing is in a module and contains classes, we need to include this directive. There’s a fine line between what we do in PowerShell and the C#-related components we enrich it with. Without this, we’d run into issues where object types cannot be found.
BeforeAll – This sets up everything needed before running all tests, such as initializing modules, setting up connections, and preparing the test environment.
Describe – This essentially speaks for itself; it defines what we are testing.
Context – Specifies the scope of a specific test case within the test. It helps organize and clarify different test scenarios.
It – Defines the expected behavior within the context. This is where we place the actual test logic to verify if the code behaves as intended.
Running the test(s)
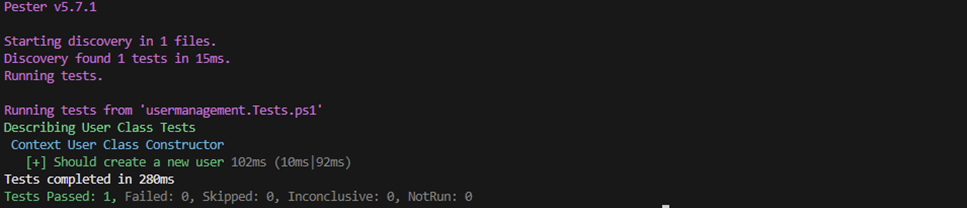
When you are in the same directory as the test file is you can run the test by calling the command;
Invoke-Pesterand you will get the result below:

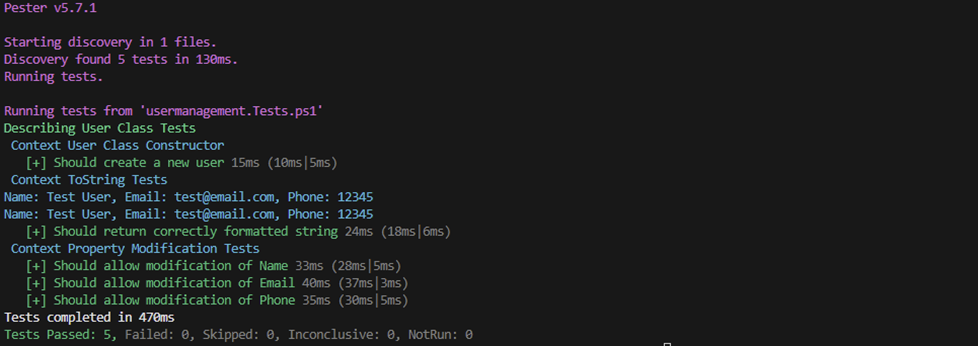
You can also run the Invoke-Pester command with parameters to enhance the testing experience. For instance run;
Invoke-Pester -Output Detailedand it will give you more insights on what the tests are actually doing.
More tests!
As we now only do one test for checking if user initialization works, we can add more tests to cover more of our code. Lets add this new testcase to our unittest
Context 'ToString Tests' {
It 'Should return correctly formatted string' {
# Arrange
$user = [User]::new("Test User", "test@email.com", "12345")
# Act
$result = $user.ToString()
$configuredResult = $user.ToString();
$expectedResult = "Name: Test User, Email: test@email.com, Phone: 12345"
Write-Host $configuredResult -ForegroundColor Cyan;
write-host $expectedResult -ForegroundColor Cyan;
# Assert
$result | Should -Be "Name: Test User, Email: test@email.com, Phone: 12345"
}
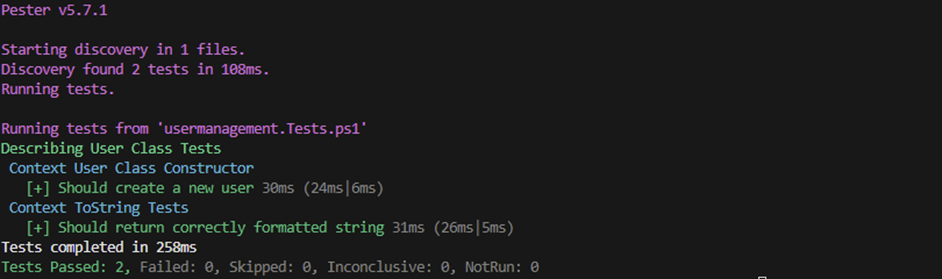
}It calls the “ToString()” method in our module. And validates that if the result matches up to what we expect in here. Run the test again and check the result! It should still provide you with all test cases succeeded.
Running into errors
Of course, as our code evolves over time, the chance of error increases as well. Fortunately, we have our ToString method covered with unit tests, so we should be alerted as soon as something changes.
Now, let’s dive into the module and make some modifications to our ToString method.
Currently it still should look like below
[string] ToString() {
        return "Name: $($this.Name), Email: $($this.Email), Phone: $($this.Phone)"
    }
But for security reasons we are no longer allowed to supply the phone number in through this method hence we will remove it from the code
And of course we will run our test again. But now it has a a different result!
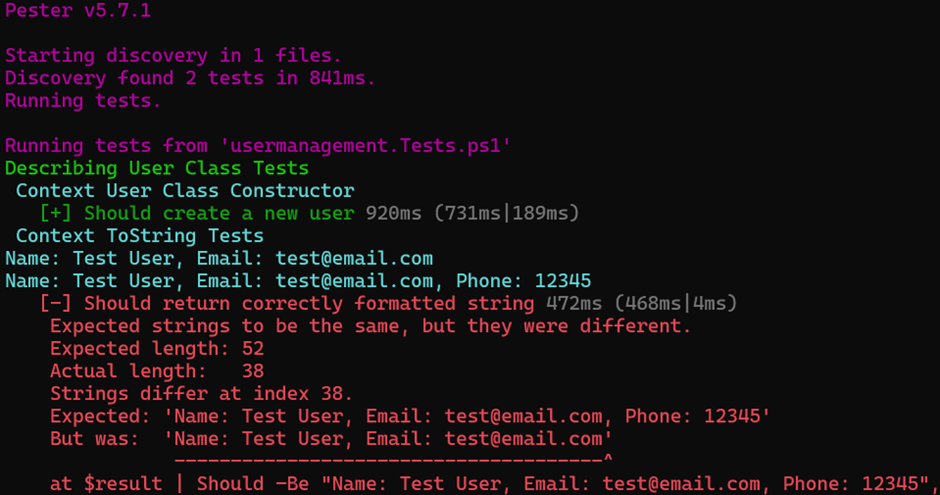
The outcome of the test no longer matches with what our code implies! So the test fails.
⚠️ PowerShell will cache your module when initially loaded. So making changes to the module and re-running the test in the same terminal might still give that the test succeeded. This is because it’s testing with ‘old’ code. To circumvent this, simply close the shell and re-open it to make sure u start with a blank ‘canvas’.
Setters
So far, we’ve tested our code by validating whether the configured result matches the expected outcome. However, our code may also modify or manipulate data within our objects.
To ensure reliability, we also need to test whether setting new values correctly updates the objects and that these changes are properly reflected.
For this we will add some more tests cases like below
Context 'Property Modification Tests' {
        It 'Should allow modification of Name' {
            # Arrange
            $user = [User]::new("Old Name", "test@email.com", "12345")

            # Act
            $user.Name = "New Name"

            # Assert
            $user.Name | Should -Be "New Name"
        }

        It 'Should allow modification of Email' {
            # Arrange
            $user = [User]::new("Test User", "old@email.com", "12345")

            # Act
            $user.Email = "new@email.com"

            # Assert
            $user.Email | Should -Be "new@email.com"
        }

        It 'Should allow modification of Phone' {
            # Arrange
            $user = [User]::new("Test User", "test@email.com", "12345")

            # Act
            $user.Phone = "67890"

            # Assert
            $user.Phone | Should -Be "67890"
        }
    }
This modifies the user object, updates its properties, and validates whether the changes were applied correctly. In PowerShell, issues at this level are unlikely to occur. However, in other high-level programming languages, some of these fields might be read-only, preventing modifications.
Re-run the test and check the result!
How to utilize
The most commonly asked question in this case is: “So, how should I utilize this in my daily routine or within my own solutions?”
Well, consider making these tests part of your CI/CD pipeline. Implementing tests in your pipeline prevents the deployment of code to critical environments if something breaks. If your unit test fails, so does your pipeline!
This approach helps you track how your code evolves over time and ensures that dependencies relying on specific outputs continue to function correctly.
Now, if you update your code to follow a new standard while legacy components still require a certain output, your tests (if written properly 😉) will immediately alert you when something no longer aligns with the expected results.
So, not only is it a great idea to start writing tests for your code, but it’s also beneficial to change the way you work. Start by creating a service layer that contains your business logic. From there, write unit tests to cover all possible cases, and only then implement the actual business logic based on those tests.
This approach is known as Test-Driven Development (TDD).
“Before writing the actual code, first design and create the test! 😉”
Summary
In this comprehensive guide to PowerShell testing, we’ve explored how to elevate your code quality through systematic testing practices. The journey began with understanding the fundamental differences between unit tests, which focus on individual components, and integration tests, which examine how these components work together. We introduced Mocking as a powerful technique to isolate code components and simulate dependencies without relying on external systems.
Pester emerged as our testing framework of choice, providing a robust foundation for PowerShell testing. Through practical examples using a User Management system, we demonstrated how to structure tests effectively using Describe, Context, and It blocks. We learned the importance of proper test setup with “BeforeAll” and how to handle PowerShell classes in tests using the using module directive.
The hands-on examples showed us how to test various aspects of our code, from basic constructor functionality to more complex property modifications and string representations. We encountered common challenges, like module caching and type verification, and learned how to overcome them with practical solutions.
Most importantly, we discovered that testing isn’t just about catching bugs – it’s about building confidence in our code. By integrating these tests into CI/CD pipelines and adopting a Test-Driven Development (TDD) approach, we can ensure our code remains reliable and maintainable as it evolves.
Remember: while testing might not be everyone’s favorite topic, it’s an essential skill that separates robust, production-ready code from simple scripts. By following the practices outlined in this guide, you’re well-equipped to start implementing effective testing strategies in your PowerShell projects.