
In my previous blog posts I’ve shown you how to start structuring your data by utilizing JSON. If you missed out this part you can check it here: https://bartpasmans.tech/start-scripting-like-a-pro-2/
This way of structuring data does have some cons. It’s not stored in a relational way (there are no cross references between objects). Its difficult to optimize and query, which will result in slow accessibility over time as the dataset grows.
And last but not least making modifications to objects and updating object data are two separate areas which also result in extra management (which is something we really don’t want 😉)
In this post I’ll guide you through the basics of setting up a database for relational data and query it using PowerShell. Again as I did in my previous blog posts I’ll stick to the user management system as example case.
During this post you’ll see this icon 🎬 which indicates that action is required so you get the full benefit out of this post.
What is relational structured data?
Before diving into the actual technical part of this blog post let me first explain the difference between what I’ve been showing you in the previous blog posts (by utilizing the JSON files) and this way (using relational structured data).
Structured relational data refers to data that is organized in a specific, predefined format using tables. The connection between tables also called relations connect data from multiple sources and combines it together.
For instance; a user can be a table in a database. This user can have groups assigned to him/her but not all users share the same group(s). In this case we have 1 user which has a relation with 0 or multiple groups.
Some key concepts you will see in this post are:
- Tables (the place which actually holds the data)
- Relationships (we are not going to put all data in one flat table, so we are going to separate this into multiple tables and bring them together with a relationship)
- Keys (primary/foreign keys which identify the record (primary key) and the relational record (foreign key)
Prerequisites
🎬 Before starting with this post make sure you have the following items installed on your development environment to gain the best experience out of it.
- Microsoft SQL Server Express: https://www.microsoft.com/en-us/sql-server/sql-server-downloads (install with default options so windows authentication is also supported)
- Microsoft SQL Management Studio: https://learn.microsoft.com/en-us/ssms/download-sql-server-management-studio-ssms
These two tools help us in setting up an express (free) edition of SQL, which is fine for our training purpose and the management studio which we’ll be using to manage the SQL Server instance.
Setting up the database
⚠️ From this level on I assume that the SQL Server instance is installed and that you can connect to it using SQL Server management studio. (if you have any questions on this part feel free to drop them below in the comments ⬇️)
What are we going to make:
We will be setting up a very simple database with two tables which will reflect the user management system.
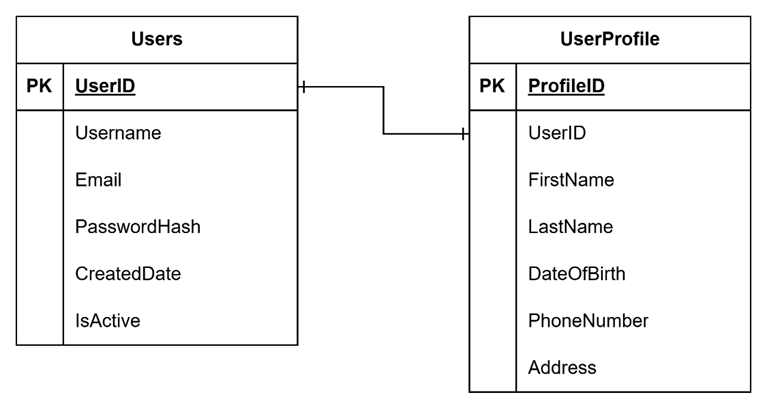
Between this tables there will be a one-to-one relationship which is identified by the “|” on the line between the two tables. There are more UML annotations for this, feel free to look them up as I won’t dive into details in this post about them 😉
As there now is a relation between these two tables it also means that one cannot live without the other. Example; if there is an user in the database which has an user profile we cannot delete the user before deleting the user profile first. To make your life easier I’ve prepared a SQL script which you can run on your local SQL server express instance to speed things up.
🎬Deploy the script below to your local SQL server express instance for setting up the database.
-- Create Users table
CREATE TABLE Users (
    UserID INT PRIMARY KEY IDENTITY(1,1),
    Username NVARCHAR(50) NOT NULL UNIQUE,
    Email NVARCHAR(100) NOT NULL UNIQUE,
    PasswordHash NVARCHAR(255) NOT NULL,
    CreatedDate DATETIME DEFAULT GETDATE(),
    IsActive BIT DEFAULT 1
);
GO

-- Create UserProfile table with one-to-one relationship with Users
CREATE TABLE UserProfile (
    ProfileID INT PRIMARY KEY IDENTITY(1,1),
    UserID INT UNIQUE NOT NULL,
    FirstName NVARCHAR(50),
    LastName NVARCHAR(50),
    DateOfBirth DATE,
    PhoneNumber NVARCHAR(20),
    Address NVARCHAR(255),
    CONSTRAINT FK_UserProfile_Users FOREIGN KEY (UserID) REFERENCES Users(UserID)
);
GO

-- Add index to improve performance on the foreign key
CREATE INDEX IX_UserProfile_UserID ON UserProfile(UserID);
GO

-- Insert sample data
INSERT INTO Users (Username, Email, PasswordHash)
VALUES ('johndoe', 'john.doe@example.com', 'hashedpassword123');

INSERT INTO UserProfile (UserID, FirstName, LastName, DateOfBirth, PhoneNumber, Address)
VALUES (1, 'John', 'Doe', '1990-01-15', '555-123-4567', '123 Main Street, Anytown');
GO
The query explained
- “CREATE DATABASE usermanagement;” – This creates the database called ‘usermanagement’ it will be the place where we actually create the tables
- “CREATE TABLE Users” – This creates the table ‘Users’ with all the fields below as the columns. Each column is identified with what kind of data it can hold (integers, strings, datetime etc.)
- “ CONSTRAINT FK_UserProfile_Users FOREIGN KEY (UserID) REFERENCES Users(UserID)” this is the actual relationship between the tables. It refers to the field userID which will be pointed to table ‘Users’ on field ‘UserID’
- “CREATE INDEX IX_UserProfile_UserID ON UserProfile(UserID);” – overkill for now 😊 but this will help SQL creating a ‘map’ to speed things up if you really have a lot of records in the database
- “INSERT INTO Users” probably speaks for itself, but this helps in inserting the data into the table
Lets query!
Before diving into code let’s first see if we can get the data out of the database.
🎬Make sure you have an open connection to the database before executing the command below
SELECT *
FROM Users u
JOIN UserProfile p ON u.UserID = p.UserID;
GO
SQL will automatically map all the fields which have the relation in one row and will show you the data

If you see the result above it means everything is setup correctly and we are good to go to the next part of this post 😉
Time to code!
Now we have the database prepared, we have some data in there it’s time to do the actual coding using PowerShell. In this part of the post I’ll show you how to do the following things;
- Getting the data out of the database
- Inserting new data in the database
- Updating the data in the database
- Deleting the data in the database
Getting data
Getting data out of the database probably is the best way to get started with it. And as we already have data in the database it should be like a walk in the park 😉
But before starting with this let’s make sure you have the correct modules installed on your system to communicate with the SQL server instance.
🎬 Execute the code below in an PowerShell terminal to make sure you have the modules installed which are required for communication with the SQL server instance.
Import-Module SqlServer -ErrorAction SilentlyContinue
if (-not $?) {
    Write-Host "SqlServer module not found. Installing..."
    Install-Module -Name SqlServer -Force -AllowClobber -Scope CurrentUser
    Import-Module SqlServer
}
Now on top of your code define the variables which are required for the connection.
🎬 Define the variables below accordingly so they fit your SQL server instance
$serverInstance = "localhost\SQLEXPRESS01"
$database = "usermanagement"
⚠️ For me the instance is called ‘SQLEXPRESS01’, make sure you modify this so it fits yours.
Now with a select query and an execution of the query we can get the result from the database.
🎬 Define the query as mentioned below for getting data out of the database
function Get-SQLData {
$query = "
SELECT
u.UserID AS User_UserID,
u.Username AS User_Username,
u.Email AS User_Email,
u.PasswordHash AS User_PasswordHash,
u.CreatedDate AS User_CreatedDate,
u.IsActive AS User_IsActive,
p.ProfileID AS Profile_ProfileID,
p.UserID AS Profile_UserID,
p.FirstName AS Profile_FirstName,
p.LastName AS Profile_LastName,
p.DateOfBirth AS Profile_DateOfBirth,
p.PhoneNumber AS Profile_PhoneNumber,
p.Address AS Profile_Address
FROM Users u
JOIN UserProfile p ON u.UserID = p.UserID;
"
try {
# Connect to SQL Server and execute the query
Write-Host "Connecting to SQL Server..." -ForegroundColor Cyan
$results = Invoke-Sqlcmd -ServerInstance $serverInstance -Database $database -Query $query -TrustServerCertificate -ErrorAction Stop
# Return the results object for potential further processing
return $results
}
catch {
Write-Host "Error executing SQL query: $_" -ForegroundColor Red
Write-Host "Make sure SQL Server is running and the database 'usermanagement' exists." -ForegroundColor Yellow
}
}
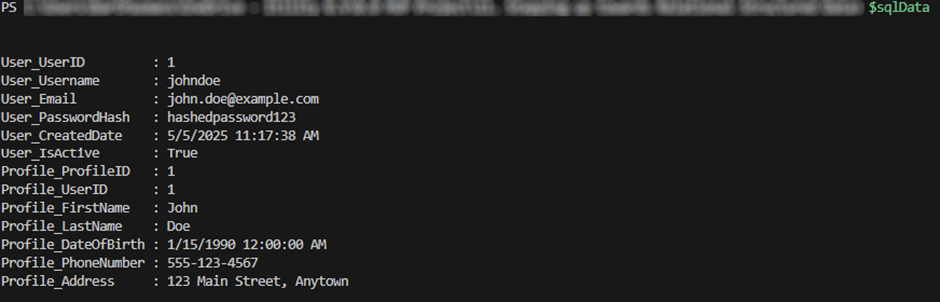
$sqlData = Get-SqlData;
💡 Have you seen the ‘AS x_[FIELD]’ prefix in the query? I’m adding these for now because UserID is available in both tables (user and userprofile). Having two identical fields makes the function ‘Invoke-SqlCmd’ run into an exception.
🎬 Run the code and check the content of ‘sqlData’ variable. You should see the result from the database as shown below.
Inserting data
Now we’ve seen on how to get data it’s time to insert data in the database.
🎬 Create the code as described below
function Insert-SQLData {
    param (
        [string]$username,
        [string]$email,
        [string]$passwordHash,
        [datetime]$createdDate,
        [bool]$isActive
    )

    $query = @"
    INSERT INTO Users (Username, Email, PasswordHash, CreatedDate, IsActive)
    VALUES ('$username', '$email', '$passwordHash', '$createdDate', '$isActive');
"@

    try {
        # Connect to SQL Server and execute the insert query
        Write-Host "Inserting data into SQL Server..." -ForegroundColor Cyan
        Invoke-Sqlcmd -ServerInstance $serverInstance -Database $database -Query $query -TrustServerCertificate -ErrorAction Stop
        Write-Host "Data inserted successfully." -ForegroundColor Green
    }
    catch {
        Write-Host "Error inserting data: $_" -ForegroundColor Red
    }
}

Insert-SQLData -username "janesmith" -email "jane.smith@example.com" -passwordHash "hashedpassword321" -createdDate (Get-Date) -isActive $true
This new function accepts for now all the parameters which are required for creating a new user.
💡 Have you noticed that we don’t create a userprofile? Well because of the relation our user can perfectly exist without a profile but not the other way around.
If you now check the SQL server instance by running the query below:
SELECT *
FROM Users
You will see our newly created user

Updating data
We now have the possibility to read and insert but we don’t have a method yet which can update our existing records. To update existing records we need to utilize the ‘update’ statement.
🎬 Create the code as described below
function Update-SQLData {
    param (
        [int]$userID,
        [bool]$isActive
    )

    $query = @"
    UPDATE Users
    SET IsActive = '$isActive'
    WHERE UserID = $userID;
"@

        try {
            # Connect to SQL Server and execute the update query
            Write-Host "Updating data in SQL Server..." -ForegroundColor Cyan
            Invoke-Sqlcmd -ServerInstance $serverInstance -Database $database -Query $query -TrustServerCertificate -ErrorAction Stop
            Write-Host "Data updated successfully." -ForegroundColor Green
        }
        catch {
            Write-Host "Error updating data: $_" -ForegroundColor Red
        }
    }

Update-SQLData -userID 1 -isActive $false
This code accepts the userID and the updated value for ‘isActive’. Based on the provided userID the relevant record is fetched from the database and the new value for isActive will be set.
If we after executing this query check the database we can see that the user is now disabled:

Deleting data
Last but not least is the deletion of records from the database. Let’s make a method which is capable on deleting existing records based on the provided userID.
🎬 Create the code as described below
function Delete-SQLData {
    param (
        [int]$userID
    )

    $query = @"
    DELETE FROM Users
    WHERE UserID = $userID;
"@

        try {
            # Connect to SQL Server and execute the delete query
            Write-Host "Deleting data from SQL Server..." -ForegroundColor Cyan
            Invoke-Sqlcmd -ServerInstance $serverInstance -Database $database -Query $query -TrustServerCertificate -ErrorAction Stop
            Write-Host "Data deleted successfully." -ForegroundColor Green
        }
        catch {
            Write-Host "Error deleting data: $_" -ForegroundColor Red
        }
    }

Delete-SQLData -userID 1
🎬 Run the query
Did the query succeeded? If you provided it with id ‘1’ it shouldn’t! You should see the error below:

💡 Because there is a relation between the userProfile and the user table it will not allow the user to be deleted as the userprofile would be in a detached state losing the relation with table it requires to have.
🎬Change the ID to ‘2’ on the user we want to delete and try again

Now if we check the database again we can see the user is really deleted:

Summary
In my previous post, I introduced you to structuring data using JSON files – a great starting point for organizing information in your scripts. Today, we’re taking the next logical step in our data management journey by exploring relational databases with SQL Server and PowerShell.
While JSON is flexible and easy to implement, it has limitations. The lack of relational capabilities, performance concerns with large datasets, and the separation between storage and modification logic creates unnecessary management overhead (which is something we really don’t want 😉).
What makes relational databases different? Instead of flat files, we organize data in tables with defined relationships between them. This approach gives us powerful capabilities:
Tables store specific types of data (Users, UserProfiles, etc.)
Relationships connect related information across tables
Keys (primary and foreign) maintain data integrity and connections
Our hands-on example demonstrates setting up a simple user management system with two related tables – Users and UserProfile. The one-to-one relationship ensures each user can have exactly one profile, while enforcing data integrity (a profile can’t exist without a user).
The SQL script I’ve provided creates this structure and populates it with sample data. Once it’s in place, we can leverage PowerShell to interact with our database through four essential operations:
Getting data (SELECT) – Retrieving user information with joined profile data
Inserting data (INSERT) – Adding new users to the database
Updating data (UPDATE) – Modifying existing records like setting a user’s active status
Deleting data (DELETE) – Removing records (with a key lesson about relationships!)
Our attempt to delete a user with an associated profile shows the power of relational integrity – SQL Server prevents the deletion to maintain data consistency. This highlights a fundamental principle of relational databases: relationships enforce rules that protect your data.
By structuring our data relationally, we gain significant advantages over flat file storage:
Improved data integrity and consistency
Better performance for complex queries
Clearer representation of business entities and relationships
Scalability for growing datasets
This approach represents a significant step up from our JSON implementation, providing a robust foundation for more complex applications while maintaining clean, organized code.
Have you implemented relational databases in your PowerShell projects? Share your experiences in the comments below!