

In my previous post, you saw how to level up your scripting game by implementing some basics. In this post, I want to dive deeper into the world of scripting with you by exploring the following topics;
- Strongly typed variables
- Return values
- Error handling
- Classes, constructors, and functions
- Data structuring and storing
Did you missed out the first one? No worries! You can find it here: start-scripting-like-a-pro-1/
Enough with the introduction—let’s get to work! 😉
Strongly typed variables
In many programming and scripting languages, you can use strongly typed variables. Some advantages of this approach include always having a specific type of object in a variable instead of relying on generics. Some of the benefits are that this keeps your code clean and readable but also makes it easier for other people to understand!
It’s also incredibly helpful for your IDE, as IntelliSense can better assist you with suggestions and options when working with objects and their respective functions. For me, the biggest advantage is keeping things clean and ensuring your code remains maintainable in the long run.
Let’s dive into some examples where I’ll show you how I use strongly typed variables!
If some of the concepts I’m about to show you are new, be sure to check out the first blog in the series (link in the introduction) where I guide you through the basics of improving your scripting game!
Here are some explanations of the different datatypes:
Strongly typed variables are enforced by the datatype specified within the square brackets.
Let me break down a few of them
[int] – Represents an integer, which contains whole numbers.
[string] – Holds a sequence of characters, including letters (a-z), numbers (0-9), and special characters.
[bool] – Represents a Boolean value: either true or false.
[datetime] – Contains a date and time in a proper datetime format.
[string[]] – Don’t confuse this with [string]. It’s a collection (array) of strings, identified by the additional square brackets ([]).
[float] – Represents numbers with decimals, like 1.23.
[hashtable] – An associative array where keys are mapped to values. Think of it as a kind of index: “on this page, you’ll find this content.”
class User {
    [string]$username;
    [int]$age;
    [string]$email;
    [bool]$enabled;
    [datetime]$created;
    [string[]]$roles;
    [float]$salary;
    [hashtable]$preferences;
}
Now that we’ve covered the basics, let’s dive into some coding and add functionality to our object(s)!
Classes, constructors and functions
Now that we’ve covered strongly typed variables, let’s see how to implement them in a code example.
class User {
    [string]$username;
    [int]$age;
    [string]$email;
    [bool]$enabled;
    [datetime]$created;
    [string[]]$roles;
    [float]$salary;
    [hashtable]$preferences;

    User([string]$Username, [int]$Age, [string]$Email) {
        if ([string]::IsNullOrWhiteSpace($Username) -or [string]::IsNullOrWhiteSpace($Email) -or $Age -le 0) {
            throw "Invalid input: Username and Email cannot be empty, and Age must be greater than 0.";
        }

        $this.username = $Username;
        $this.age = $Age;
        $this.email = $Email;
    }
}
As you can see, our class has received its first method: User. If you look closely, you’ll notice that the method’s name matches the name of the class. When this happens, we’re dealing with a special type of method called a constructor.
A constructor is a method that always gets called when a class is initialized. It’s perfect for setting up mandatory fields that should exist. When a new object of the class is created!
💡 Have you noticed the $this keyword? It refers to the current object itself, ensuring that the targeting scope remains within the object and doesn’t accidentally reference variables outside of it.
Now let’s extend the code further!
class User {
    [string]$username;
    [int]$age;
    [string]$email;
    [bool]$enabled;
    [datetime]$created;
    [string[]]$roles;
    [float]$salary;
    [hashtable]$preferences;

    User([string]$Username, [int]$Age, [string]$Email) {
        if ([string]::IsNullOrWhiteSpace($Username) -or [string]::IsNullOrWhiteSpace($Email) -or $Age -le 0) {
            throw "Invalid input: Username and Email cannot be empty, and Age must be greater than 0.";
        }
        $this.username = $Username;
        $this.age = $Age;
        $this.email = $Email;
    }

    SetSalary([float]$Salary) {
        $this.salary = $Salary;
    }
}

$user = New-Object User("bart.pasmans",34,"bart@bartpasmans.tech");
$user.SetSalary(2050.50);
$user;
There’s no need to implement an additional check to validate if all fields (like username, age, and email) are in place anymore—this is already handled by the constructor! 😉
We can jump straight into setting the salary!
Return types
Sometimes when manipulating objects or doing business logic over them you want to have the modified object back in ‘return’. Specifying return types helps you in bringing your functions to a higher level. We’ve already see what kind of object types exist, these are already valid return types! 👌
Now let’s work with some ‘return’ types.
 [void]SetNonActive() {
        $this.enabled = $false;
    }

    [void]SetActive() {
        $this.enabled = $true;
    }
Here’s a tricky one! 😉 [void] doesn’t return anything, making it ideal for situations where we simply want to perform an action without requiring feedback. However, if feedback is required, void wouldn’t be the appropriate return type to use.
In our case, it fits perfectly! The two new methods are designed to set the enabled status to either true or false, depending on which method is called. Since we don’t need any feedback, void works just fine here.
Now, let’s introduce a method with a return type to get more insights into what we can do next!
    [string]GetUserDisplayName() {
        return "$($this.username) - ($($this.age))";
    }
As you can see, we have a method called GetUserDisplayName(), which returns a string. The return type is identified by the datatype specified between the square brackets before the method name.
This method always returns a string by interpolating the username and age, separated by a – in the middle. If we now have 100 users and request their display names, all will follow the same consistent format. (Remember, the constructor already ensures that both username and age contain valid data.)
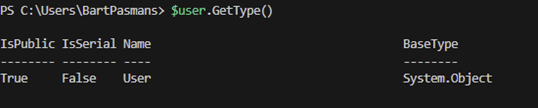
This return type can be applied to any datatype—even custom objects! (Fun fact: objects also have a typeof.)
💡POWERSHELL TIP: to find an object’s type, just enter: $user.GetType() or whatever name u gave your variable
Error handling
Error handling helps us set up constraints in our scripts, enforce them, and manage them in a way that aligns with our intended logic. It helps in catching errors and making the code more robust!
Let’s build upon our existing user object and enhance it with some error throwing and, even more importantly, error handling!
To make this more engaging, let’s give our user the ability to have their salary increased. (After all, who doesn’t like a pay raise, right?)
We’ll implement this method on our user object:
 IncreaseSalary([float]$Increase) {
        if(!$this.enabled) {
            throw "User is not active, cannot increase salary.";
        }
 }
As you can see, we’ve also established our first constraint: the user must be active in order to receive a pay raise. The if(!) statement essentially means “If not.” So, if $this.enabled is not true, we’ll throw an error.
If we attempt to increase the user’s salary now, we’ll see that our constraint comes into play:

But wait, we haven’t specified that our user is inactive, right?
True! The default value for the Boolean is false, so the user is always created as ‘disabled.’ Let’s enable the user and try again!
The default value for the Boolean is false, so the user is always created as ‘disabled.’ Let’s enable the user and try again!
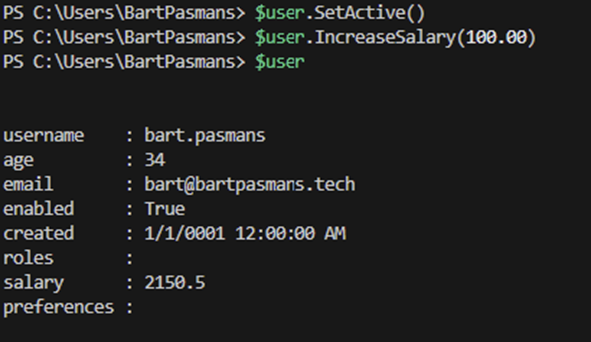
Success! And of course, our user is very happy with the pay raise! 😉
💡If you want to modify the default value of the enabled Boolean for all new users, you can do so by specifying it directly on the field itself. Simply modify it like this to give a defined field a default value:
class User {
    [string]$username;
    [int]$age;
    [string]$email;
    [bool]$enabled = $true;
    [datetime]$created;
    [string[]]$roles;
    [float]$salary;
    [hashtable]$preferences;
}
Data structuring and storing
When I give my training sessions, I always like to share my little “inside joke” about storing data whether it’s configuration data or data related to our objects. The options I often hear are:
- Text
- XML
- CSV
- INI (yes, even the old trusted INI!)
Personally, I prefer to store it in JSON (pronounced as ‘Jason’—and here comes the silly joke): I’m not referring to the singer Jason Derulo! 😉 Readers attending my training sessions have probably heard this one dozens of times.
JSON is great for bringing structure to your data and offers seamless integration for converting objects to JSON (serialization) and back from JSON to objects (deserialization).
With this, we can easily store our objects in a data file and later revert the data back into an object whenever needed!
To retain all our users, we’ll create a separate class for now—a simple one that holds multiple instances of our user object.
Have you noticed I marked the word “multiple”? This should ring a bell! It suggests that we might need to store either 0, 1, or many objects. 😊 So, what type of object would (be suitable for) storing this kind of data?
A collection! Let’s dive into the code and ensure we can hold all these users in our system.
class UserManagementSystem {
    [System.Collections.ArrayList] $users = @();

    [void] AddUser([User]$user) {
        $this.users.Add($user);
    }

    [void] RemoveUser([User]$user) {
        $this.users.Remove($user);
    }

    [void] SaveUsers() {
        $this.users | ConvertTo-Json | Set-Content -Path "users.json";
    }
}
With our user management system now in place we can start adding a user to our user management!
$userManagementSystem = New-Object UserManagementSystem;
$user = New-Object User("bart.pasmans",34,"bart@bartpasmans.tech");
$userManagementSystem.AddUser($user);
But let’s not stop there? After all, we’re IT folks! Let’s make sure our system can also handle multiple additions at the same time. For that, we’ll introduce a new method!
[void] AddUsers([User[]]$users) {
        foreach ($user in $users) {
            $this.AddUser($user);
        }
    }
Notice the relationship between AddUsers and AddUser? The add logic remains the same this way! All users will consistently be added using the same method. If you ever need to apply additional constraints, you only need to modify the AddUser method, and all other methods that implement it will follow your updated logic.
Now, let’s call the new method for adding them!
$userManagementSystem.AddUsers(@($user, $user1, $user2));
And as you can now see:
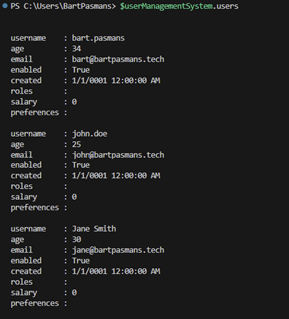
We have our users!
Now, the last thing is to ensure they’re stored for persistence. Let’s call the SaveUsers method to save everything! The file will be saved at the path from which you’re running the script.
The other way around
Let’s now introduce a method for loading on our user management system
    [void] LoadUsers() {
        $this.users = Get-Content -Path "users.json" | ConvertFrom-Json;
    }
Now lets clean everything up and load the data again
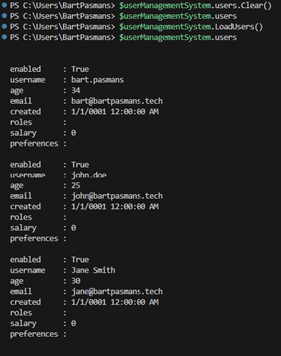
As you can see, we clear all users on the first line. The second line confirms that there are no users left.
After calling the LoadUsers method, you’ll notice that the users are restored in the object and can be used again for reference! 😉
Summary
So, we’ve covered the classes and the constructor. We’ve also seen how to set up constraints and handle errors.
Most importantly, we’ve learned how to make our objects more persistent by storing them in a structured data format and bringing them back to objects when needed! 😊
I hope this has provided you with more insight into scripting and how to level up your scripting game.
#ScriptingLikeAPro