

In the previous blog posts, I’ve shown how to get started with advanced scripting—implementing functions, using (advanced) parameters, working with modules, and testing everything. Now, in the current post, I’m taking things a step further by explaining how we can speed things up.
I’ll go through the basics of threading in PowerShell, also known as ‘jobs’, which will help you trigger multiple background processes to drastically speed up the processing speed of your code.
I’ll also guide you through some advanced (bit overkill 😆) approaches on how to achieve even a higher execution time by utilizing runspaces! But for the learning purpose it’s good to have it addressed and to show you how you could potentially implement this.
Enough with the chit-chat, let’s get started!
Background jobs
PowerShell jobs are a powerful feature that allow you to run commands or scripts in the background using a parallel approach. They are considered as ‘background-jobs’ because they way they are being executed in their own process with their own memory and unique runspace.
In regular runtime PowerShell does the processing of it’s logic and iterations in sequence meaning that before going to the next ‘phase’ the previous ‘phase’ should be completed first. (layer by layer or iteration-based). Think of a PowerShell job as a new PowerShell session that runs independently of your main session.
Each job assigned as a PowerShell job runs in its own process, which means that it has its own memory space and can’t directly affect your main PowerShell session.
This way, every PowerShell job gets its own highway! The image below gives a rough idea of how this works:

On the sequential highway, cars drive in a single stream to get home with every car driving where the car on front needs to ‘park’ first (complete) before the other can park (be completed).
💡 Although the jobs share the same code and run in their own process there are small fluctuations in time-to-complete. Variables like processing speed, memory, system capacity and many others impact the total execution time.
But on the parallel highway, each car has its own lane. They’re not bothered by other cars and can continue their journey without interference or sharing and are not depending on the car in front of them to be ‘parked’ (completed) first.
Before diving into the next parts of this post a proper introduction to the ways of processing is required. We now have seen the difference between the sequential way of processing in comparison to the parallel processing. But this wouldn’t be a PowerShell post with some code! So let’s see in a coding example on how the sequential processing differentiates towards the parallel approach(es).
Sequential processing
For this part I’ve prepared a small piece of code which we want to run. The code is provisioned below:
function Simulate-HeavyTask {
    param (
        [int]$TaskId,
        [int]$DelaySeconds
    )
    Write-Host "Starting task $TaskId"
    Start-Sleep -Seconds $DelaySeconds
    Write-Host "Completed task $TaskId"
    return "Task $TaskId completed"
}

# Sequential processing example
Write-Host "`nSequential Processing:" -ForegroundColor Green
$sequentialStart = Get-Date

# Run 10 tasks sequentially
$results = @()
for ($i = 1; $i -le 10; $i++) {
    $results += Simulate-HeavyTask -TaskId $i -DelaySeconds 2
}

$sequentialEnd = Get-Date
$sequentialDuration = ($sequentialEnd - $sequentialStart).TotalSeconds
Write-Host "`nSequential processing took: $sequentialDuration seconds" -ForegroundColor Yellow
What does it do?
This code contains a function that simply writes output to the terminal but waits for x seconds before each execution. In this example, the delay is set to 2 seconds.
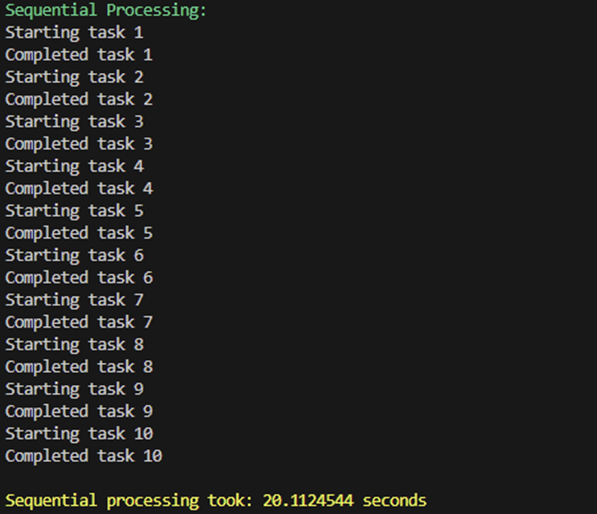
This is a perfect example of sequential processing. For each iteration, it starts the task, processes it, and then returns the result. When you run the code, you’ll get the following output:
Now, let’s see how we can speed this up by implementing parallel processing!
Parallel processing
For this part I’ve prepared a bit more complicated code. The code is provisioned below:
Write-Host "`nParallel Processing:" -ForegroundColor Green
$parallelStart = Get-Date

# Start all jobs in parallel
$jobs = @()
for ($i = 1; $i -le 10; $i++) {
    $jobs += Start-Job -ScriptBlock {
        param($TaskId, $DelaySeconds)
        function Simulate-HeavyTask {
            param (
                [int]$TaskId,
                [int]$DelaySeconds
            )
            Write-Host "Starting task $TaskId"
            Start-Sleep -Seconds $DelaySeconds
            Write-Host "Completed task $TaskId"
            return "Task $TaskId completed"
        }
        Simulate-HeavyTask -TaskId $TaskId -DelaySeconds $DelaySeconds
    } -ArgumentList $i, 2
}

# Wait for all jobs to complete and collect results
$parallelResults = @()
while ($jobs.Count -gt 0) {
    $completedJobs = @()
    foreach ($job in $jobs) {
        if ($job.State -eq 'Completed') {
            # Get the output
            $output = Receive-Job -Job $job

            # Display the output
            Write-Host $output -ForegroundColor Cyan

            $parallelResults += $output
            $completedJobs += $job
        }
    }

    # Remove completed jobs
    $jobs = $jobs | Where-Object { $completedJobs -notcontains $_ }

    Start-Sleep -Milliseconds 100
}

# Clean up
Get-Job | Remove-Job

$parallelEnd = Get-Date
$parallelDuration = ($parallelEnd - $parallelStart).TotalSeconds
Write-Host "`nParallel processing took: $parallelDuration seconds" -ForegroundColor Yellow

# Show improvement
$improvement = $sequentialDuration - $parallelDuration
$improvementPercent = ($improvement / $sequentialDuration) * 100
Write-Host "`nImprovement: $improvement seconds ($improvementPercent% faster)" -ForegroundColor Cyan
What does it do?
For the same number of iterations (in this case, 10), this code adds functions to the jobs collection. These jobs are all based on the exact same code as the sequential processing example.
Next, in the iteration after the while loop (the part identified with the ‘foreach’, which repeats a piece of code until a certain condition is met), it checks if there are any jobs, and if so, executes them by using Receive-Job. The result from each job is fetched and displayed in the terminal in the exact same way as in the sequential processing example.
The result? almost 7 times faster processing!
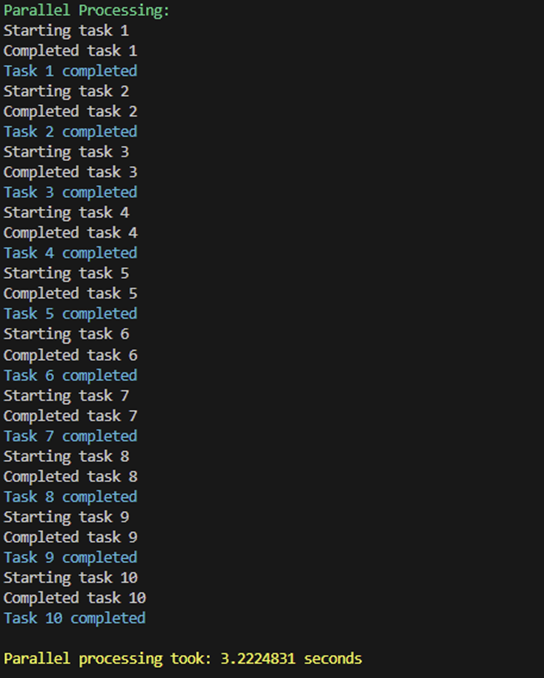
We went from 20 seconds to 3.2 seconds processing time for 10 iterations! Imagine having a system with hundreds of entries which need to be processed by iterating them and doing the same logic over and over per iteration!
In this case (did the math 😉) we achieved 84% extra efficiency by doing this!
Speeding up further by removing the abstraction
I’d like to take the opportunity in this post to show the difference when the abstraction is removed. Again, in this example, I’ll use the Simulate-CPUHeavyTask function created earlier.
But before diving into the more advanced approach (which can be overkill—but for learning purposes, I’ll still show how to do it), let’s first get some metrics on how long the current function takes to complete.
To do this, I’ll run the code five times using the regular Start-Job approach shown in the previous example.
| Run | Time to complete (in seconds) |
| 1 | 4.5535518 |
| 2 | 3.5369918 |
| 3 | 3.581857 |
| 4 | 3.5233841 |
| 5 | 3.5894101 |
And the run for the code also 5 times with the more complicated ‘Runspaces’ approach:
| Run | Time to complete (in seconds) |
| 1 | 2.2067087 |
| 2 | 2.1083182 |
| 3 | 2.1033638 |
| 4 | 2.101714 |
| 5 | 2.1196433 |
The last approach is roughly 35%–38% faster than the regular Start-Job approach! But at a cost—it’s much more complicated and significantly increases maintenance complexity.
Always consider which approach is the best option. Do you really need the extra speed if it comes at the cost of complex maintenance? Or can you stick with the more straightforward approach and keep things simple? It’s your decision—but don’t take it lightly.
Why is this faster?
There are key differences between starting a runspace with Start-Job approach and the RunSpaces approach, which I indicate in below overview.
| Item | Start-Job approach | RunSpaces approach |
| Process / Thread overhead | Creates a new PowerShell session process for each job | Stays with one process but creates threads in this process |
| Resource initialization | Needs to initialize a PowerShell environment per iteration for the start-job function | Each iteration (as job) shares the same PowerShell environment |
| (de)- serialization | Communicate by serialization and deserialization of jobs | The executing runspace can access data in memory directly |
| Startup | Startup time from moment of creation to running needed | Can start directly (no warming up) |
| Memory | Per iteration of start-job memory required for its separated processes | Shared memory consumption |
| Scheduling | OS-Level scheduling as each process needs to be scheduled by the system | Immediate access as they share the same process and require less memory. Less memory = better performance |
Also for this I’ve prepared some code which you can use to test! Below I’ve placed an example on how to remove the abstraction by implementing the runspacepool and add a new handling thread to the runspacepool for processing
Write-Host "`nDirect Runspace:" -ForegroundColor Green
$runspaceStart = Get-Date

# Create a runspace pool
$sessionState = [System.Management.Automation.Runspaces.InitialSessionState]::CreateDefault()
$pool = [runspacefactory]::CreateRunspacePool(1, 10, $sessionState, $host)
$pool.Open()

# Create a list for runspaces
$runspaces = New-Object System.Collections.ArrayList

# Function as string to inject into each runspace
$functionScript = @'
function Simulate-HeavyTask {
    param (
        [int]$TaskId,
        [int]$DelaySeconds
    )
    Write-Host "Starting task $TaskId"
    Start-Sleep -Seconds $DelaySeconds
    Write-Host "Completed task $TaskId"
    return "Task $TaskId completed"
}
'@

# Start all tasks
for ($i = 1; $i -le 10; $i++) {
    $PowerShell = [powershell]::Create()
    $PowerShell.RunspacePool = $pool

    # Add the function definition and then call it with the correct TaskId
    [void]$PowerShell.AddScript($functionScript)
    [void]$PowerShell.AddScript("Simulate-HeavyTask -TaskId $i -DelaySeconds 2")

    # Add to collection
    [void]$runspaces.Add([PSCustomObject]@{
        PowerShell = $PowerShell
        Handle = $PowerShell.BeginInvoke()
    })
}

# Wait for all to complete
$results = @()
foreach ($rs in $runspaces) {
    $results += $rs.PowerShell.EndInvoke($rs.Handle)
    $rs.PowerShell.Dispose()
}

# Display results
foreach ($result in $results) {
    Write-Host $result -ForegroundColor Cyan
}

# Clean up
$pool.Close()
$pool.Dispose()

$runspaceEnd = Get-Date
$runspaceDuration = ($runspaceEnd - $runspaceStart).TotalSeconds
Write-Host "`nDirect Runspace took: $runspaceDuration seconds" -ForegroundColor Yellow
What does it do?
This part creates a runspace where the threads can run. You can find the information here:
The 1 parameter is the minRunSpaces and the 10 the maxRunSpaces. Remember the highway overview I made at the start of this blogpost? Basically we provide a 10 lane highway here. You can find it in this part of the code
$sessionState = [System.Management.Automation.Runspaces.InitialSessionState]::CreateDefault()
$pool = [runspacefactory]::CreateRunspacePool(1, 10, $sessionState, $host)
$pool.Open()
In the next part the actual code that needs to run in the runspace is being defined and added to an execution list.
# Function as string to inject into each runspace
$functionScript = @'
function Simulate-HeavyTask {
    param (
        [int]$TaskId,
        [int]$DelaySeconds
    )
    Write-Host "Starting task $TaskId"
    Start-Sleep -Seconds $DelaySeconds
    Write-Host "Completed task $TaskId"
    return "Task $TaskId completed"
}
'@

# Start all tasks
for ($i = 1; $i -le 10; $i++) {
    $PowerShell = [powershell]::Create()
    $PowerShell.RunspacePool = $pool

    # Add the function definition and then call it with the correct TaskId
    [void]$PowerShell.AddScript($functionScript)
    [void]$PowerShell.AddScript("Simulate-HeavyTask -TaskId $i -DelaySeconds 2")

    # Add to collection
    [void]$runspaces.Add([PSCustomObject]@{
        PowerShell = $PowerShell
        Handle = $PowerShell.BeginInvoke()
    })
}
After completion of the code, the last part will run which is shown below
# Wait for all to complete
$results = @()
foreach ($rs in $runspaces) {
    $results += $rs.PowerShell.EndInvoke($rs.Handle)
    $rs.PowerShell.Dispose()
}

# Display results
foreach ($result in $results) {
    Write-Host $result -ForegroundColor Cyan
}

# Clean up
$pool.Close()
$pool.Dispose()
Getting the result from the threads in the RunSpace and printing this so we can see the result. This part is important because the result is not writable from the individual thread towards the running PowerShell session we have. Otherwise we’ll miss the output from the jobs 😉
Closing and disposing ensures that all resources in the RunSpace get cleaned up correctly, so we have no left overs in memory after the processes are finished.
Summary
In this blog post, we explored how to significantly improve PowerShell script performance through parallel processing techniques. I’ve demonstrated the potential efficiency gains when moving from traditional sequential execution to parallel execution using PowerShell jobs and RunSpaces.
Key Concepts Covered:
- Sequential vs. Parallel Processing:
- Sequential processing runs tasks one after another, creating bottlenecks
- Parallel processing runs multiple tasks simultaneously (like multiple highway lanes)
- PowerShell Background Jobs:
- Each job runs in its own PowerShell process with independent memory space
- Provides isolation but with higher overhead
- Runspaces Deep Dive:
- Creates a custom thread pool for more efficient parallel execution
- Provides significant performance gains but with increased code complexity
- Detailed explanation of runspace implementation with code examples
- Why Runspaces Outperform Jobs:
- Less overhead (threads vs. processes)
- Shared PowerShell environment
- Direct memory access vs. serialization
- Faster startup time
- Lower memory footprint
- More efficient thread scheduling
Try to make some of your iterations speed-up with these tips! 😉 enjoy the journey and I hope this was useful for you! Let me know what improvements you experience.
And! Last but not least, don’t make things too complicated! Having that extra performance sounds nice at the start, but deeply consider if you really need to have this at the cost of extra complexity!
Full code
# Function to simulate a time-consuming task
function Simulate-HeavyTask {
    param (
        [int]$TaskId,
        [int]$DelaySeconds
    )
    Write-Host "Starting task $TaskId"
    Start-Sleep -Seconds $DelaySeconds
    Write-Host "Completed task $TaskId"
    return "Task $TaskId completed"
}

# Regular Jobs
Write-Host "`nRegular Jobs:" -ForegroundColor Green
$regularStart = Get-Date

$jobs = @()
for ($i = 1; $i -le 10; $i++) {
    $jobs += Start-Job -ScriptBlock ${function:Simulate-HeavyTask} -ArgumentList $i, 2
}

while ($jobs.Count -gt 0) {
    $completedJobs = @()
    foreach ($job in $jobs) {
        if ($job.State -eq 'Completed') {
            $output = Receive-Job -Job $job
            Write-Host $output -ForegroundColor Cyan
            $completedJobs += $job
        }
    }
    $jobs = $jobs | Where-Object { $completedJobs -notcontains $_ }
    Start-Sleep -Milliseconds 100
}

Get-Job | Remove-Job
$regularEnd = Get-Date
$regularDuration = ($regularEnd - $regularStart).TotalSeconds
Write-Host "`nRegular Jobs took: $regularDuration seconds" -ForegroundColor Yellow

# Direct Runspace approach
Write-Host "`nDirect Runspace:" -ForegroundColor Green
$runspaceStart = Get-Date

# Create a runspace pool
$sessionState = [System.Management.Automation.Runspaces.InitialSessionState]::CreateDefault()
$pool = [runspacefactory]::CreateRunspacePool(1, 10, $sessionState, $host)
$pool.Open()

# Create a list for runspaces
$runspaces = New-Object System.Collections.ArrayList

# Function as string to inject into each runspace
$functionScript = @'
function Simulate-HeavyTask {
    param (
        [int]$TaskId,
        [int]$DelaySeconds
    )
    Write-Host "Starting task $TaskId"
    Start-Sleep -Seconds $DelaySeconds
    Write-Host "Completed task $TaskId"
    return "Task $TaskId completed"
}
'@

# Start all tasks
for ($i = 1; $i -le 10; $i++) {
    $PowerShell = [powershell]::Create()
    $PowerShell.RunspacePool = $pool

    # Add the function definition and then call it with the correct TaskId
    [void]$PowerShell.AddScript($functionScript)
    [void]$PowerShell.AddScript("Simulate-HeavyTask -TaskId $i -DelaySeconds 2")

    # Add to collection
    [void]$runspaces.Add([PSCustomObject]@{
        PowerShell = $PowerShell
        Handle = $PowerShell.BeginInvoke()
    })
}

# Wait for all to complete
$results = @()
foreach ($rs in $runspaces) {
    $results += $rs.PowerShell.EndInvoke($rs.Handle)
    $rs.PowerShell.Dispose()
}

# Display results
foreach ($result in $results) {
    Write-Host $result -ForegroundColor Cyan
}

# Clean up
$pool.Close()
$pool.Dispose()

$runspaceEnd = Get-Date
$runspaceDuration = ($runspaceEnd - $runspaceStart).TotalSeconds
Write-Host "`nDirect Runspace took: $runspaceDuration seconds" -ForegroundColor Yellow

# Show improvement
$improvement = $regularDuration - $runspaceDuration
$improvementPercent = ($improvement / $regularDuration) * 100
Write-Host "`nDirect Runspace improvement: $improvement seconds ($improvementPercent% faster)" -ForegroundColor Cyan