
If I need to address right now a type of technology which really makes me happy it would be ‘event driven architecture’. For me this is a real game changer where we no longer do things based on an interval, or a constant checking mechanism. No! We do things real-time, responding to actual events the moment they are occurring in the cloud.
In this new blog post I will discuss the approach for setting up some basic event driven architecture using Azure Event Grid (as the ‘mediator’) and Azure Functions. But before immediately diving into technology, let me give you some introductions first.
For instance, when u receive files on a storage account and you want to take action when these files are placed. Or when files on a storage account get deleted! We can make sure that whenever these kind of events happen we take appropriate action.
Event Driven Architecture
Event driven architecture flips the default model as I mentioned above. Instead of constantly asking “Has anything happened?” our system simply listens for something to happen and creates a response/does an action based on how it’s programmed to act.
What makes this approach so powerful is its scalability and efficiency. When nothing is happening, your system is mostly idle, consuming minimal resources. But when events start flowing – maybe during peak hours or a busy sales period – your architecture can scale to handle thousands of events per second, each triggering exactly the right response.
It’s also incredibly flexible. With traditional polling approaches, adding a new type of response often means modifying existing code. But with event-driven systems, you can simply add new subscribers to existing event streams without changing your publishers at all. This makes your architecture more modular and easier to maintain over time.
That’s the shortest introduction I believe I can give in this context 😉 but enough with the chit-chat. Let’s get started.
Again, this blog post will be identified with 🎬 so you know when to take action!
What are we going to make
Before diving into the making itself. Let me first provide you with an overview on what we are going to make:
What’s this going to do?
We want to be informed as mentioned. We don’t want to constantly ask the systems “Hey, has something changed?”. No! We want to respond when something changes. In this case we will be focusing on a Storage Account.
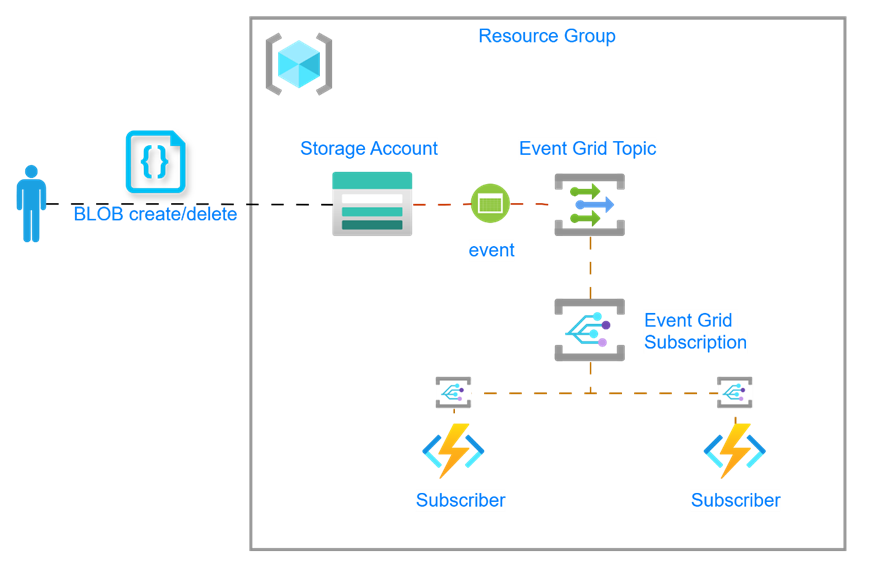
This is what happens:
- A user/identity creates or deletes a BLOB
- The Storage account sends out an event to the Event Grid Topic
- The Event Grid Topic receives the event
- The event gets published to all Event Grid Topic Subscribers
- Azure function gets triggered with the Event Grid Topic Event data
To make sure all services within this overview understand each other, they are following the ‘CloudEventSchema V1_0’ directive. More details are mentioned below.
Cloud Event Schema:
The Cloud Event schema defines a standardized specification for describing event data which is shared among the vendors who support them. It describes how events are handled and how these events are defined.
Other important attributes in this schema are:
- Subject (event subject within the context of its source)
- Time (timestamp of the event within the context of its source)
- Data (payload of the event)
And way more. If you want more information about this feel free to check out the Microsoft documentation on this:
https://learn.microsoft.com/en-us/azure/event-grid/cloud-event-schema
Assumptions:
I assume in this blog post that you know how to create basic Azure resources without detailed guidance. If you run into issues please let me know in the comments and I’ll help you out!
Event Grid Topic
This is basically the ‘mailbox’ where we’ll be dropping the messages on the Event Grid. Whenever one of the message producers creates a message, this message will be delivered to this topic. This eventually makes everybody who is listening on it aware that a new message has been delivered and should be processed.
Think of it as that central point where all messages come together. It doesn’t matter where they come from – could be from a storage account, could be from a custom application, anything that creates events! The topic receives them all and makes sure they’re organized properly.
The cool thing is that the producers of messages don’t need to know who’s listening. They just throw their messages into this mailbox and continue with their business. It’s then up to the topic to figure out who should be notified about what message.
For our setup, we’ll configure the Storage Account to drop its blob events (created files, deleted files, etc.) into this mailbox, and our Azure Function will be one of the listeners picking up these messages whenever they arrive. No constant checking needed – just react when something happens! 😉
Let’s get started!
Configuring the managed identity
For everything to work correctly, we need to set up a managed identity. I prefer to use a User managed identity for this setup as we don’t want it to be deleted when resources linked to it are removed. Also, I’ve seen cases where the managed identity gets changed when Topics are updated (especially when using system-assigned identities) resulting in lack of permissions and a non-working Event Grid setup.
🎬 Deploy a user managed identity from the Azure market place

- Give the user assigned managed identity a name and continue
Configuring the storage account
We need a storage account for the Azure Function and for the files we are going to upload, in order to trigger Event Grid.
🎬 Deploy a basic storage account and make sure you have one blob container called ‘files’ on it so you’ll end up with a storage account as defined below

Configuring Event Grid
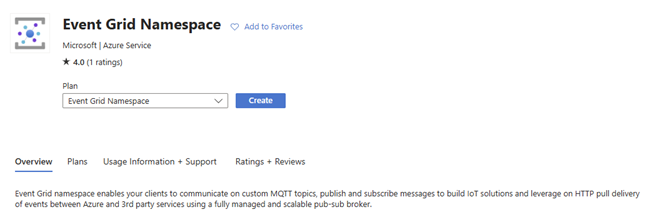
Let’s start by creating an Event Grid from the Azure Marketplace.
🎬 Find the Azure Event Grid from the Azure Marketplace and deploy it.
- Continue the deployment of the Azure Event Grid. During the configuration you can leave the default values for now. They won’t have any impact on the content of this blog post.
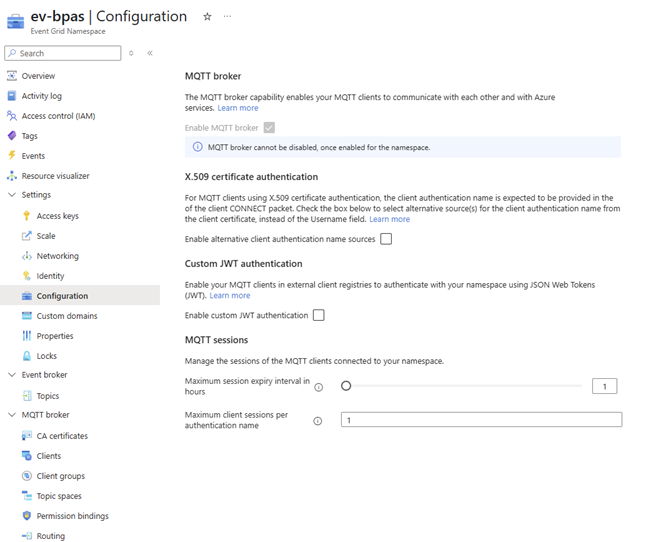
🎬 Make sure to enable the MQTT broker after deployment, as it is required for the Event Grid service to communicate with other Azure resources.
- Now create a topic, which we will use to send the messages to. Go to Event broker and choose “Topics”. Enter the details like below or choose your own configuration values.
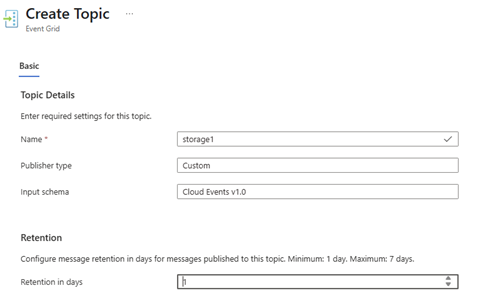
💡 Retention can be set to 1 day for now. We don’t need longer for this example.
Remember the user managed identity we made in the previous post? We now need to give that identity the appropriate permissions on the Event Grid.
🎬 Go to IAM on the Event Grid and give the managed identity the role ‘Event Data Contributor’

For now we are done on this part. We will come back to the Event Grid as soon as we going to make the subscribers!
Deploying the Azure Function
The Azure Function will be used to store the business logic. This business logic will be executed as soon as the function gets triggered. In my previous blog post:
I’ve shown how to create a HTTP triggered Azure Function. In this example we are going to use a different trigger as we now want to be informed by the Azure Event Grid.
🎬 Deploy the Azure Function following the steps below
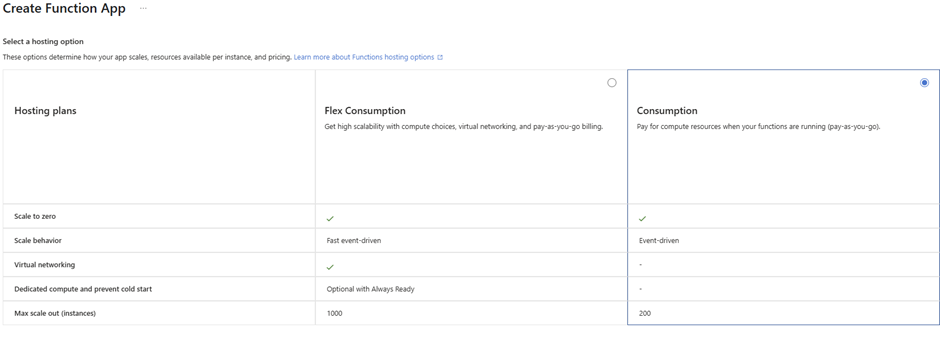
- From the Azure Market place deploy an Azure Function app with the ‘Consumption’ plan
- Continue with the deployment of the Azure Function and enter the details as shown below:
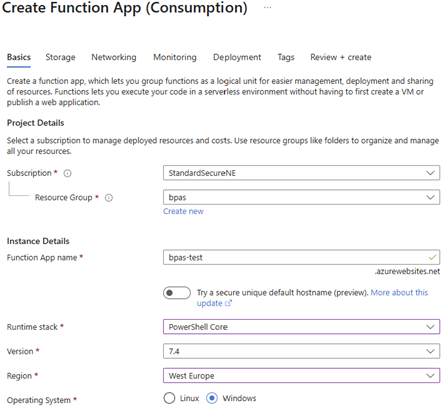
⚠️ Most important part here is to choose the “Runtime stack” and “Version”. The other tabs are not important for the purpose of this blog and can be ignored.
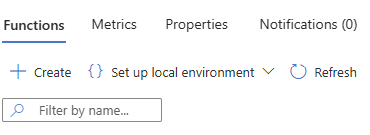
🎬 As soon as the Function App is deployed create a “Event Grid Triggered Function” on the function app following the steps below.
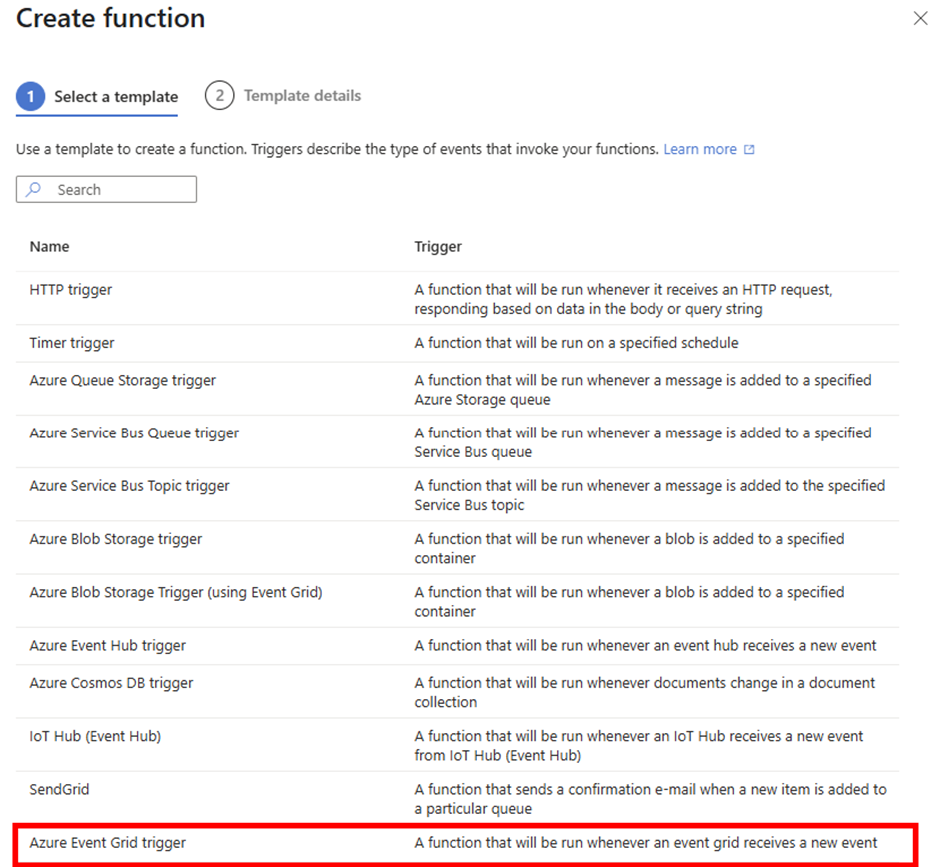
- On the Azure Function App go to ‘Function’ and click ‘Create’
- Choose the ‘Azure Event Grid trigger’ in the list of functions as indicated below to create this function.
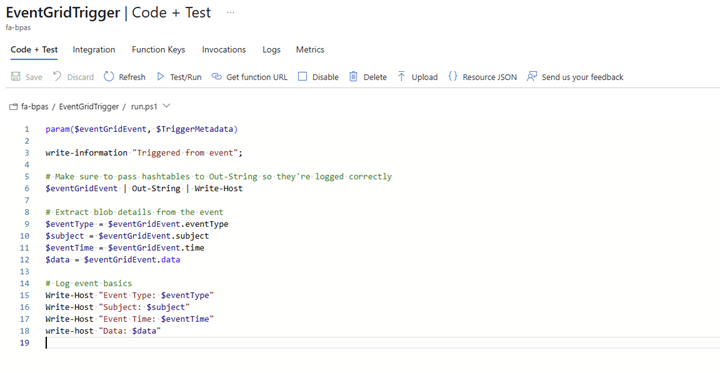
- Open the function and give it the code below;
param($eventGridEvent, $TriggerMetadata)

write-information "Triggered from event";

# Make sure to pass hashtables to Out-String so they're logged correctly
$eventGridEvent | Out-String | Write-Host

# Extract blob details from the event
$eventType = $eventGridEvent.eventType
$subject = $eventGridEvent.subject
$eventTime = $eventGridEvent.time
$data = $eventGridEvent.data

# Log event basics
Write-Host "Event Type: $eventType"
Write-Host "Subject: $subject"
Write-Host "Event Time: $eventTime"
write-host "Data: $data"
Your function should look like this:
⚠️ Now go to the “Get function URL” as shown below

🎬 Copy the ‘eventgrid_extension’ key and note it somewhere! We need this key to create a subscriber to the Event Grid Topic.

Configuring Event (publisher)
Now that we have the main infrastructure ready, it’s time to let the Storage Account know that all events it generates should be sent to the Event Grid. Before we dive into this step, let’s recap what we’ve accomplished so far in this post:
- Deployed the user managed identity (which will handle secure communications)
- Created the storage account (which will generate events when files are created/deleted)
- Deployed the function app (which will process these events)
- Deployed the Event Grid topic (which will serve as our messaging hub)
- Retrieved the function’s eventgrid_extension key (which we’ll need for the subscription)
This next step is crucial as it establishes the connection between our storage account and the Event Grid topic. This tells the storage account “hey, whenever something happens with your blobs, send an event to this topic.” Without this configuration, our events would never reach the Event Grid, and our function would never be triggered.
Let’s go ahead and configure our storage account to start sending events!
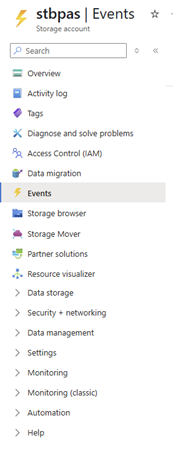
🎬 Go to your deployed Storage Account and follow the steps below
- Go to the Events on the Storage Account
- Fill in the event details and choose BLOB Create & BLOB Delete as event types
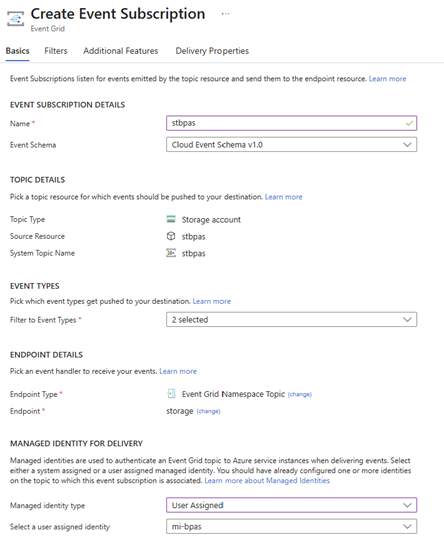
⚠️ Remember the managed identity we configured at the start? We need It here! Make sure you select the managed identity you’ve created as the ‘managed identity for delivery’
Configuring Event (publishing)
Now that the Storage Account is configured to send events to the Event Grid, it’s time to make sure that the Event Grid publishes these events to the Azure Function. Because we initially configured the Topic from the Storage Account, the Event Grid already knows the schema from this resource. This makes our setup easier since we don’t need to define the event structure manually.
🎬 Configure the Event Subscriber following the steps below
- Go to the Event Grid Topic and click ‘Entities’ and choose ‘Event subscriptions’
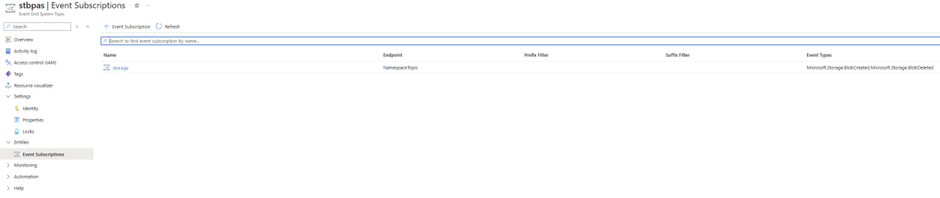
- Create a new event Subscription and provide it with a name
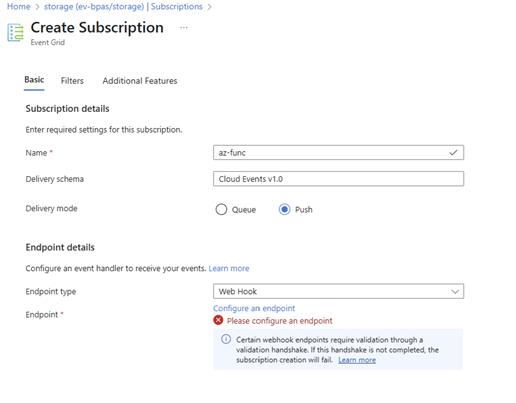
⚠️ Here we enter the endpoint address by choosing ‘configure an endpoint’ that we copied from the Azure Function. If you lost it go back to your Azure Function and get the Event Grid URL from there. (Earlier in this post I’ve explained how to get this URL)
Time for some testing!
Now we are fully setup and ready to test out our new event driven Azure Function. From here it’s ‘cool’ to have 2 tabs open to see real-time results 😉 so make sure you have 1 tab open for the Azure function and 1 tab open for the storage account.
🎬Open the Azure Function
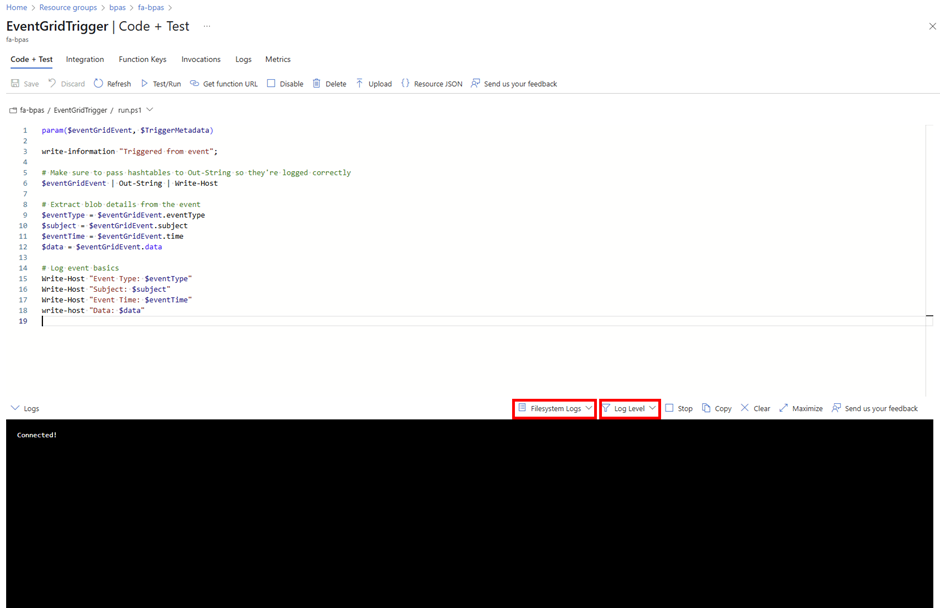
Set the log level to ‘Information’ and set the ‘App insights log’ to ‘Filesystem logs’
We need to do this to see all the output the function generates. Also we only put the output right now to the filesystem. Without changing these options we won’t see any output 😉
Uploading a file
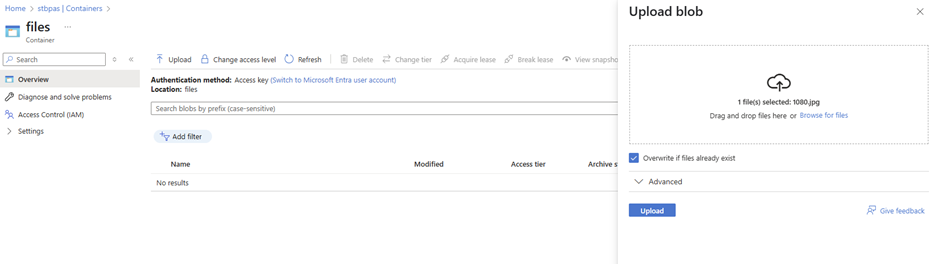
Now on your other tab (while having the Azure function also open on another screen) go to the Storage Account and make sure you have this screen in front of you:
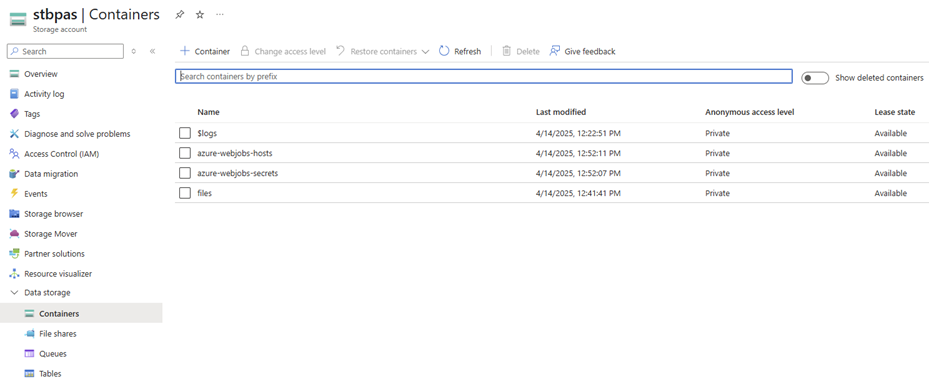
- Open the blob container ‘files’ and upload a file towards the Storage Account
💡On the “Function App” screen you should see output like below:
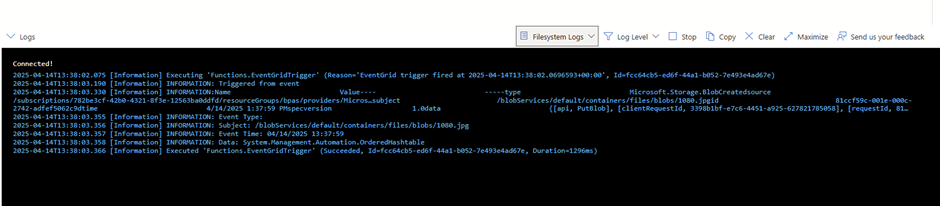
This means that the Communication path is working! The Azure Storage Account now sends out an event to the Event Grid because a blob is created. The Event Grid checks the subscriptions to see who needs to be informed about this event and informs them accordingly.
As our Azure Function is in the subscriptions list, it gets informed about this event and shows the data in the console.
🎬 Now delete the file from you just uploaded from the Storage Account
You should see as below that the ‘Event type’ is now set to ‘BlobDeletedsource’
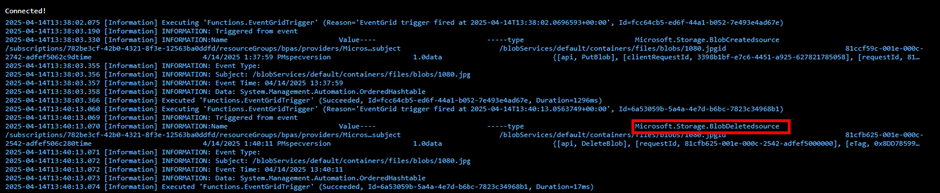
Now you clearly can see the difference between the two types of events. The ‘create’ and the ‘delete’ event. 😉
Summary
In this blog post, I’ve shown you how to implement an event-driven approach instead of the constant asking of “Has anything changed?” Pretty cool right? 😉We’ve built a simple yet powerful setup with three main parts:
- A Storage Account that sends out events when files are created or deleted
- An Event Grid which acts as our mediator and knows who to inform
- An Azure Function which responds to these events and runs our PowerShell code
All these components communicate to each other using the CloudEventSchema V1.0 standard, and with our user-managed identity having the right permissions, everything works smoothly together.
The real magic happens when you realize you’re no longer wasting resources by constantly checking for changes. Now your system just sits there, waiting for something to happen, and only then takes action. Way more efficient!
This is just a basic example of course. You could apply this same approach to tons of other scenarios – maybe responding to IoT events, security alerts, or database changes. It’s all about getting notified when something actually happens rather than constantly asking if something happened.
For me, this approach is a game changer. It’s like the difference between constantly checking traffic websites to see if there’s congestion ahead versus having a modern GPS that automatically alerts you when a traffic jam appears and instantly suggests an alternative route. You’re not wasting time repeatedly checking for problems – the system just notifies you when something requires your attention and provides a solution right away.
Next time you find yourself writing a script that checks for changes every few minutes, remember this post and consider using Event Grid instead! If you’ve got questions or run into any issues, drop me a comment below and I’ll help you out.