

One of the questions I’m often asked is how to improve scripting skills. Whether it’s during a training session or an informal conversation, the same challenge comes up time and again: many people start with what I’d call “the wrong mindset.” Now, let me clarify—there’s no absolute “right” or “wrong” here, but adopting a machine-oriented way of thinking can significantly elevate your scripting game.
What do I mean by a “machine way of thinking”? It’s about understanding how the systems you’re working with operate, step by step, beneath the surface. When you think like a machine, you start to anticipate how your script interacts with the architecture, processes, and data flows. And trust me, this mindset shift is a game-changer.
I firmly believe that cultivating this approach can make you better at your job—whether you’re a developer, administrator, DBA, or cloud engineer. It’s not just about writing code that works; it’s about writing code that’s efficient, scalable, and robust.
For me, this realization was pivotal. It transformed the way I approached problem-solving and design, especially when it came to crafting solutions or writing scripts. I became more motivated because I wasn’t just coding—I was understanding. I was diving deep, uncovering how things work “below the waterline,” and using that knowledge to build smarter, better solutions.
In this second article of my series on personal development, I’ll take you through the lessons I’ve learned on this journey. I’ll share insights, pitfalls to avoid, and the architectural mistakes I made so you can steer clear of them. My goal is to help you build a stronger foundation for your scripting and IT expertise.
This will be a series of posts, so stay tuned 😉
Let’s dive in—and enjoy the ride!
Firsts things first, where are your objects?!
When working in IT, you’ve probably heard the terms “object-oriented programming” (OOP) and structured development. Great! That’s the first step toward adding much-needed structure to your scripts or code. But let’s be honest—not everyone finds this terminology crystal clear right off the bat.
So, if you’re new to the concept, keep reading—this section is for you! If you’re already familiar, feel free to skip ahead 😊.
When I give training sessions on OOP and structured development, I like to take a step back from the technical jargon and use relatable, non-technical examples to explain the core ideas. Why? Because it’s easier to grasp the essence of something complex when it’s tied to something simple and familiar.
In this article, I’ll stick with that same approach and walk you through object-oriented scripting in a way that feels intuitive. Whether you’re a coding newbie or just brushing up on the basics, this section is here to give you that “aha!” moment.
Let’s get started!
Objects, objects and more objects!
Consider an object as something you can observe around you right now. Are you indoors? Take a look at the building you’re in! Can you spot the objects already? Let me break it down with some examples:
- The building itself is an object.
- The windows are objects.
- The flooring is an object.
- The lighting is an object.
Each of these objects has its own properties—attributes that describe it.
Zooming in!
Let’s zoom in on the windows for a moment. A window can have several properties, such as:
- Double glazed: Is it double glazed? (Yes or no)
- Can be opened: Can it open? (Yes or no)
- Color of the frame: What color is it?
- Sub-frames within the frame: Does it have smaller frames inside?
These properties define the window and give us meaningful details about it. Now, let’s take it a step further and translate this concept into code!
For this example, we’ll use PowerShell to demonstrate how these object properties are represented technically. While PowerShell is our language of choice here (supported from version 5 onwards—so make sure you’re up to date!), the same principles apply to any scripting or coding language that supports object-oriented development.
Here’s how this would look in code:
class Window {
    [bool]$DoubleGlazed = $true;
    [bool]$CanBeOpened = $false;
    [string]$Color = "White";
}

$Window = New-Object Window;
Which reflects in your terminal as
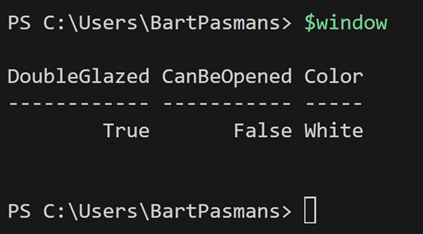
Recap!
This is now your first object! Some recap till now;
- Your $window is now of type ‘Window’
- The object has 3 properties
- DoubleGlazed: A Boolean property (type bool) that can have the value true or false.
- CanBeOpened: Another Boolean property with a similar true/false value.
- Color: A string property (type string) that can hold any combination of characters or numbers.
Now lets add those windows they are of course part of the building you are in right? 😊
So, let’s introduce a new object called Building and start nesting these objects together!
class Building {
   Windows = [System.Collections.ArrayList]::new();
}

class Window {
    [bool]$DoubleGlazed = $true;
    [bool]$CanBeOpened = $false;
    [string]$Color = "White";
}
$Building = New-Object Building;
$Window = New-Object Window;
$Building.Windows += $Window;
Here, we’ve created a new object, Building, with a property called Windows, which is an array designed to hold multiple Window objects.
Accessing Nested Objects
Now that we’ve nested our objects, we can access specific windows within the building using:
$Building.Windows[0] (where 0 stands for the very first element in the array)
From there, you can also retrieve or modify the window’s properties:
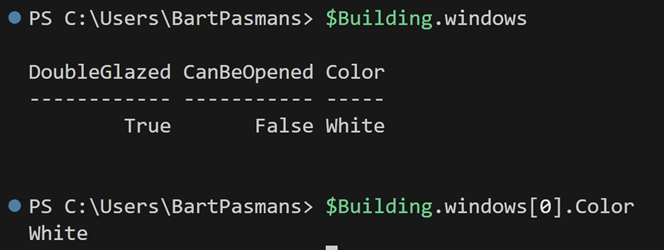
What you’ve done here is create an object (Window) within a collection of a custom object (Building). This concept can be extended to as many levels as your use case requires. You’re not limited to predefined types like String, Boolean, or Int—you can create and nest your own custom types!
The possibilities are endless. Think about how this structure can simplify complex scenarios by organizing data logically and hierarchically.
Explore, experiment, and see how object-oriented scripting can transform the way you approach your coding challenges!
Adding Functionality to Our Objects
Now that we’ve built a basic structure, let’s take it a step further by adding functionality. Our goal is to:
- Add multiple windows to the building.
- Keep track of whether each window is open or closed.
- Enable opening and closing windows while maintaining logical consistency between properties.
To do this, we’ll add a new property to the Window object, called IsOpened, to track the window’s current state. We’ll also introduce methods (functions within the object) to open and close windows.
class Building {
    $Windows = [System.Collections.ArrayList]::new();
}
class Window {
    [bool]$DoubleGlazed = $true;
    [bool]$CanBeOpened = $false;
    [bool]$IsOpened = $false;
    [string]$Color = "White";

    Open() {
        $this.IsOpened = $true;
    }
    Close() {
        $this.IsOpened = $false;
    }
}
$Building = New-Object Building;
$Window1 = New-Object Window;
$Window2 = New-object Window;

$Building.Windows.Add($Window1);
$Building.Windows.Add($Window2);

$Building.Windows[0].Open();

If we now want to open the first window we can enter:
$Building.windows[0].open()
Which now results as:
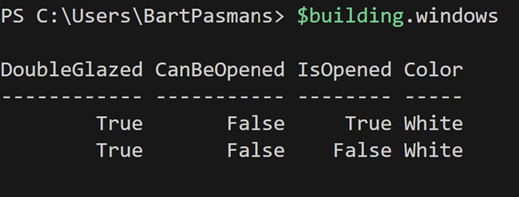
Observing the Mistake
In this code, I’ve intentionally introduced a logical error. The property CanBeOpened is set to false, yet the Open() method still allows the window to be marked as IsOpened = true. This is a contradiction—if a window cannot be opened (CanBeOpened = false), it should logically never be in an opened state (IsOpened = true).
If you run the code above, the first window will open despite being designed to remain closed. This inconsistency highlights the importance of aligning functionality with properties in your objects.
Why Highlight This Mistake?
Mistakes like these may not immediately cause problems, but over time, as your code grows in complexity, they can lead to unexpected behavior. Such issues make your code confusing for both you and anyone else who might work on it in the future.
Lesson Learned
When designing objects and their methods, ensure that the properties and functionality work together logically. For example, in this case, you’d want to add a check inside the Open() method to verify CanBeOpened before allowing the window to open:
Open() {
    if ($this.CanBeOpened) {
        $this.IsOpened = $true;
    } else {
        Write-Output "This window cannot be opened."
    }
}
By catching and resolving such contradictions early on, you’ll make your scripts more reliable and easier to maintain.
Whats next?
Now that you’ve been introduced to the basics of adding structure to your code, we’re just scratching the surface! In the next parts of this series, we’ll build on this foundational example and dive into creating more advanced scripts.
With a focus on cloud environments, we’ll use this example to demonstrate:
- Managing objects in Azure: Learn how to create, manipulate, and control Azure resources programmatically.
- Processing data within objects: Explore efficient ways to handle and analyze the data stored in these objects.
This is where scripting gets exciting, as you’ll see how these principles apply in real-world scenarios, especially in managing modern cloud infrastructures.
Stay tuned for the upcoming articles—it’s going to be an exciting journey!
Thank you for the article very well. Explained. I have been using PowerShell for some time but always thought classes are very complex and I never touched it until now . It all come to make sense. I can start to understand the basics of it.
There is one small typo in the code => The $ sign is missing in this 2nd screenshot.
class Building {
Windows = [System.Collections.ArrayList]::new();
}
class Window {
[bool]$DoubleGlazed = $true;
[bool]$CanBeOpened = $false;
[string]$Color = “White”;
}
$Building = New-Object Building;
$Window = New-Object Window;
$Building.Windows += $Window;
Also if I may add since you are showing out put on the console when i try to run the logic for open function it does not show the output in the console. I changed it to write-host to view. I understand write-output is better than write-host but in this context since we are explaining in console I thought write-host will be good. Please feel free to correct me if I am wrong .
Once again thank you so much for explaining 🙂 .. keep up the good work coming 🙂 .
Regards
SK.
Hi Suresh,
Thanks for your feedback! Both options are good. You can also specify just the variable itself after initialization like ‘$Building’ this would also output the object to the shell.
Then there is no real need to choose between write-host or write-output.
Thanks for pointing out the screenshot! 🙂 I’ll see if i can get it fixed asap. Tell then, for whoever reads, he/she is informed 🙂 thanks!
Bart