

Welcome to this new blog post in which we’re going to see how to make API’s with GraphQL and consume them using PowerShell.
In my previous blog posts, I’ve shown how to level up your scripting game by implementing object-oriented programming, introducing advanced functions, optimizing performance with threading, and handling errors effectively. Now, it’s the perfect time to take things a step further by focusing on centralized code management and handling structured results.
That’s where APIs come into play. APIs allow you to expose your logic in a controlled manner, making it accessible to external consumers—whether that’s another application, a script, or even an entire system. And by “external,” I don’t just mean third-party users; your API can be designed for internal use only, serving as a bridge between different components of your own infrastructure.
In this post, we’ll explore how to build APIs, how to interact with them via PowerShell, and why this approach can make your automation and scripting more scalable, maintainable, and efficient as you will provide access to your logic outside of your own running context like your own machine/server.
Note: This blog post contains 🎬 icons. If you see this icon there is some action expected from you before you can continue.
GraphQL will be the API of choice for this blog as it is fast to set up, even though it is still a bit challenging 😉
There are more types of APIs like REST, SOAP, Azure Functions (yes they can be APIs as well!), Sockets, Event Driven APIs, GRPC, tRPC). I’m not making a comparison between the APIs and when you should use which type of API. Maybe that is something for later, let me know!
Let’s get started!
Setting up the API
In the previous blog posts (URL below as reference), we’ve seen how to deal with our own custom ‘user management system’. The User management system describes a detailed way of creating new objects and storing them in a system:
Now we will be moving away from storing these objects locally and get them centralized! (for a reasonable learning curve we will stick to localhost of course, but if interested into publishing APIs let me know! 😉)
Prerequisites
🎬Before we can continue with the rest of this post there are some things we need in advance. Make sure you have the following things installed on your system:
Explanation: the API we are going to set up is built on NodeJS and to make the process go smoothly we’ll be using NPM to install and run everything.
Setting up the API structure
Before we continue with setting up the files, we have to make sure we have a dedicated directory where we’ll be storing the API Schematic, the API Server and the PowerShell file used to query the custom-built API.
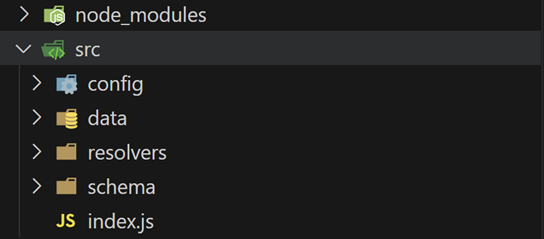
🎬Setup your directory structure as shown in the screenshot below.
You don’t have to create ‘node_modules’ this will be done automatically in one of the next steps
Explanation
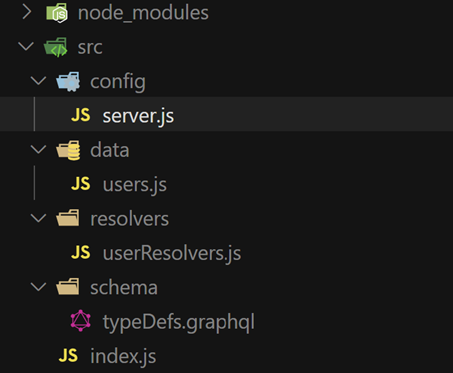
Config: Directory where the server itself will be stored. It contains the files required for server parameters and correlation with the other files we have.
Data: For now, this is the directory where we will be storing the data for the API. Although for this blog we’ll be using a static file (normally you would utilize a DB/Document DB for this)
Resolvers: Contains the logic and functions that determine how data will be fetched for each field in the API.
Schema: The API Schematic which explains the API server how to deal with the type of data, methods and what to expect in return from the API.
The API Package
In the root of the “src” directory we will be configuring the package descriptor which contains packages and libraries used for running the API. It’s also a big time saver as we don’t have to install and keep track of all the dependencies ourselves.
🎬 Make a file called “package.json” in the root structure and give it the content described below.
{
  "name": "graphql-user-server",
  "version": "1.0.0",
  "description": "GraphQL server for user management",
  "main": "src/index.js",
  "scripts": {
    "start": "node src/index.js",
    "dev": "nodemon src/index.js"
  },
  "dependencies": {
    "@apollo/server": "^4.9.5",
    "express": "^4.18.2",
    "graphql": "^16.8.1",
    "graphql-tag": "^2.12.6"
  },
  "devDependencies": {
    "nodemon": "^3.0.2"
  }
}
As you can see, we will be using Apollo server for hosting the API. For some more information about Apollo please check out their documentation on: https://www.apollographql.com/docs/apollo-server
Dataset
We will be using some test data for the API as we will not focus on setting up an actual database. We will stick to a static file for now.
🎬 Under the data folder create a file ‘users.js’ and provide it with the content described below.
const users = [
  {
    name: "John Doe",
    email: "john@example.com",
    phone: "+1234567890"
  },
  {
    name: "Jane Smith",
    email: "jane@example.com",
    phone: "+0987654321"
  }
];

module.exports = users;
This will be the data we are going to query from our PowerShell code. Hard coded for now. But it is perfect for this learning exercise.
Resolvers
The resolver(s) describe the functionality of the API we are building. It’s basically the same as in the previous blog post about how to setup your advanced functions with Powershell, but now in a different language.
😉As you can see, the same pattern learned from the previous blog post now comes back to a different language. But with the same principle/mindset.
🎬Under the resolvers folder create a file ‘userResolvers.js’ and provide it with the content described below.
const users = require('../data/users');

const resolvers = {
  Query: {
    users: () => users,
    user: (_, { email }) => users.find(user => user.email === email)
  },
  Mutation: {
    addUser: (_, { input }) => {
      if (users.some(user => user.email === input.email)) {
        throw new Error('User with this email already exists');
      }

      users.push(input);
      return input;
    },

    updateUser: (_, { email, input }) => {
      const userIndex = users.findIndex(user => user.email === email);
      if (userIndex === -1) {
        throw new Error('User not found');
      }

      users[userIndex] = {
        ...input,
        email
      };

      return users[userIndex];
    },

    deleteUser: (_, { email }) => {
      const userIndex = users.findIndex(user => user.email === email);
      if (userIndex === -1) {
        throw new Error('User not found');
      }

      users.splice(userIndex, 1);
      return true;
    }
  }
};

module.exports = resolvers;
API Schematic
The schema describes what the API looks like. Using a map as a metaphor it describes;
- What data exists (the locations on the map)
- How to access it (the paths to get there)
- How to modify it (methods to update the map)
- What information is required (the required fields)
- What information is optional (the optional fields)
Just like a map, the schema is a contract that both the server and clients must follow. It’s the single source of truth that defines the API’s structure and capabilities.
🎬Under the schema folder create a file ‘typeDefs.graphql’ and provide it with the content described below.
type User {
  name: String!
  email: String!
  phone: String!
}

type Query {
  users: [User!]!
  user(email: String!): User
}

input AddUserInput {
  name: String!
  email: String!
  phone: String!
}

type Mutation {
  addUser(input: AddUserInput!): User!
  updateUser(email: String!, input: AddUserInput!): User!
  deleteUser(email: String!): Boolean!
}
Server
Last but not least, the server needs to be created. We have our “database” (2 users! 🥳), we have the schematic telling us how to communicate with the API and we have the resolver which helps us getting to the right parts of the API.
🎬 Under the config folder create a file ‘server.js’ and provide it with the content described below
const express = require('express');
const { ApolloServer } = require('@apollo/server');
const { expressMiddleware } = require('@apollo/server/express4');
const { ApolloServerPluginDrainHttpServer } = require('@apollo/server/plugin/drainHttpServer');
const http = require('http');
const cors = require('cors');
const bodyParser = require('body-parser');
const fs = require('fs');
const path = require('path');

const typeDefs = fs.readFileSync(path.join(__dirname, '../schema/typeDefs.graphql'), 'utf8');
const resolvers = require('../resolvers/userResolvers');

async function startServer() {
  const app = express();
  const httpServer = http.createServer(app);

  const server = new ApolloServer({
    typeDefs,
    resolvers,
    plugins: [ApolloServerPluginDrainHttpServer({ httpServer })]
  });

  await server.start();

  app.use(
    '/graphql',
    cors(),
    bodyParser.json(),
    expressMiddleware(server)
  );

  const PORT = process.env.PORT || 4000;
  httpServer.listen(PORT, () => {
    console.log(`🚀 Server ready at http://localhost:${PORT}/graphql`);
  });
}

module.exports = startServer;
💡If port 4000 is already in use by your system feel free to use a different port. But then keep in mind that during a later stage in this post we also need to use this port to call the API.
Let’s run!
Now we have everything set up, the directory structure and the files should look like below:
❔If you are missing the ‘node_modules’ directory you need to run the command ‘npm install’ first. This will install all dependencies specified in the package.json.
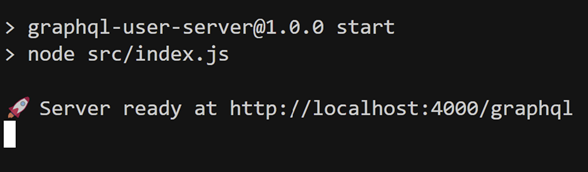
🎬Now run the solution by running the command ‘npm start’. You should see the output described below
🎬Open the URL provided in the command line in your browser. The Apollo API UI should become visible.
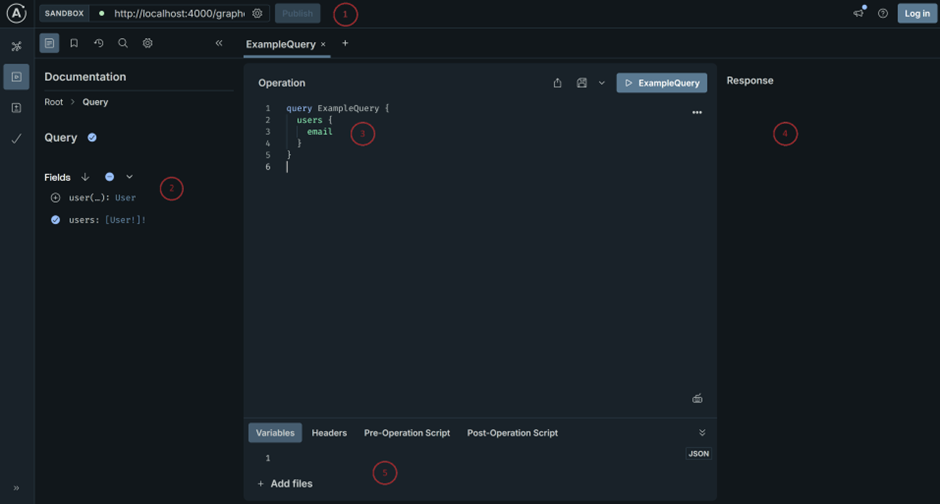
Description (5 points in the screenshot above)
- The URL of the API we need, as we need to know to which place we have to sent the request to
- The schematic area which describes what we have in our API (which objects, properties, functions etc)
- The GraphQL query which will be used to query the API
- The actual response if we run the API query and what comes out of it
- Area where headers and variables can be set for API actions
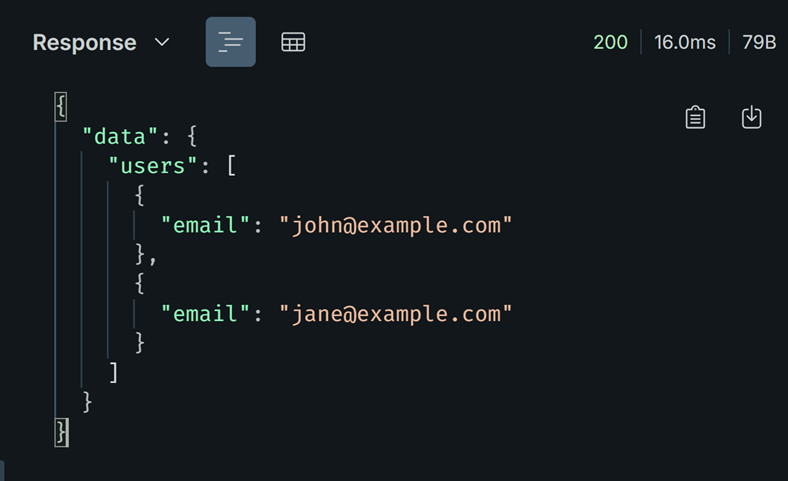
🎬 Now run the query below and check the result
query Users {
  users {
    email
  }
}
The result should be like in the screenshot below
You always get a response in combination with an HTTP Status code. As a short summary the ranges of the HTTP status codes I’ve mentioned below:
100 – 199 Contain informational messages
200 – 299 Contain successful operations
300 – 399 Redirection
400 – 499 Client related errors
500 – 599 Server related errors
Consume the API with PowerShell
Of course, this is a PowerShell blog post so now we are actually going to call the API, we will use PowerShell. To communicate with the API we need to use an HTTP Client. For this we’ll be using the ‘invoke-restmethod’ cmdlet .
🎬 Use the script below to call the API
$graphqlEndpoint = "http://localhost:4000/graphql"

$query = @"
query GetUsers {
    users {
        name
        email
        phone
    }
}
"@

$Headers = @{
    'Content-Type' = 'application/json'
}

$body = @{
    query = $Query
}

$jsonBody = $body | ConvertTo-Json -Depth 10

$response = Invoke-RestMethod -Uri $graphqlEndpoint -Method Post -Body $jsonBody -Headers $Headers
Which should provide you with the result below:

Sending data with PowerShell
As we now know how to get data from the API it’s also important to know how to send data in the case of creation of new objects or updating existing ones.
🎬 Use the script below to call the API
$graphqlEndpoint = "http://localhost:4000/graphql"  # Local GraphQL server endpoint

$mutation = @"
mutation AddUser {
    addUser(input: {
        name: "Info Bart Pasmans"
        email: "info@bartpasmans.tech"
        phone: "+1122334455"
    }) {
        name
        email
        phone
    }
}
"@

$Headers = @{
    'Content-Type' = 'application/json'
}

$body = @{
    query = $mutation
}

$jsonBody = $body | ConvertTo-Json -Depth 10

$response = Invoke-RestMethod -Uri $graphqlEndpoint -Method Post -Body $jsonBody -Headers $Headers
$response
If you check the response you should see that the user is added:

Now run the first query again with PowerShell. You should now see updated output!

The user is now found in the user management system of the API.
💡As mentioned we are not persistently storing the user data. Which means that on restart of the server the data is gone. Consider using a database for storing the data if you want persistency.
Summary
In this post, we explored how to create and consume APIs using PowerShell. Building on previous discussions around object-oriented programming, advanced functions, and performance optimization, we took the next step by centralizing logic with an API.
We set up a GraphQL API using Node.js, Apollo Server. The API structure included a schema to define the data, resolvers to handle requests, and a static dataset for testing. Once the server was running locally, we tested it using the Apollo UI.
With the API in place, we used PowerShell’s Invoke-RestMethod to query and manipulate data. We demonstrated how to retrieve users and how to send data using GraphQL mutations to add new users.
This approach improves automation by making scripts more scalable, structured, and maintainable. While we used a static file for data storage, integrating a database would enable persistence.
For those looking to take this further, deploying the API beyond localhost would be the next step.
😉 As for those who are looking for a fast run without doing all above I’ll add the entire solution to my GitHub repository. You can find and download it from there!