
Welcome back! If you joined me in Part 1,2 and 3!, you already know we’re on a mission to prove that PowerShell can do a whole lot more than run scripts on a Windows machine. It can be containerized, deployed, scaled, and orchestrated, right inside Azure Kubernetes Service (AKS).
If you by any means missed the first three parts you can find them here:
In the fourth part of the series, we’re taking things a big step further. We’re going to make our PowerShell microservices accessible from the outside world. That means setting up an Ingress Controller to manage incoming traffic, configure routing to our services, and secure the connections so users, or other services can reach them safely.
In this post, we’re taking the next step by upgrading our ingress layer. Instead of continuing with NGINX, we’ll migrate our existing ingress setup to the Azure Application Gateway Ingress Controller (AGIC).
This change moves traffic management out of the cluster and into Azure’s native Layer 7 load balancer, giving us tighter integration with the platform, centralized TLS handling, and improved visibility and security controls. Most importantly, we’ll do this without redesigning our microservices, the change is focused entirely on how traffic enters the cluster.
Reason for this as NGINX will be out of support as ingress controller for AKS.
Still the same disclaimer as before:
👉 This blog is not about debating architecture, cost models, or whether PowerShell microservices are a “good idea.”
Throughout this post, you’ll again see the 🎬 icon highlighting steps you should actively follow along with, as well as 💡 notes that provide helpful context and tips so you don’t get lost on the way.
Ready to update the gates of our AKS city? Let’s dive in! 🚀
Azure Application Gateway explained
Imagine your AKS cluster as a large office building.
Inside, everything runs smoothly. Different teams occupy different floors. One team handles the public website. Another manages APIs. Others run background PowerShell jobs. Each team focuses on its work without worrying about who’s coming in from the street.
In the early days, the building placed its receptionist inside the lobby. Visitors walked straight into the building, then stopped at the front desk. The receptionist checked where they were going and directed them to the right floor. That receptionist was our NGINX Ingress Controller.
It did its job well. But it also meant that anyone could step into the lobby before being checked.
As the building grows, security tightens.
Instead of letting visitors into the lobby first, management builds a security entrance outside the building. Before anyone reaches the front door, they pass through this checkpoint. Badges are verified. Appointments are checked. Bags are scanned. Only approved visitors are allowed anywhere near the lobby.
That checkpoint is Azure Application Gateway.
Now here’s the key part: the security staff at this entrance don’t make decisions on their own. They follow instructions that come from inside the building. Floor plans, team locations, and access rules are continuously updated and sent outward.
That communication layer is the Application Gateway Ingress Controller (AGIC).
AGIC watches the ingress definitions inside Kubernetes and keeps the external entrance in sync. When a new service appears, a route changes, or TLS settings are updated, the checkpoint adapts automatically, without anyone manually reconfiguring the gate.
From the visitor’s perspective, nothing feels complicated:
Requests for / go to the frontend
Requests for /api reach the API serviceSecure HTTPS is enforced by default
But from the building’s perspective, everything is cleaner. The lobby stays quiet. The teams focus on work. Security is handled before traffic ever reaches the building.
This shift is more than swapping one receptionist for another. It’s about moving responsibility outward:
Traffic inspection happens outside the cluster
TLS termination is centralized
Security policies live at the perimeter
The cluster is no longer directly exposed to the internet
Kubernetes remains responsible for running workloads. Application Gateway becomes the front door. AGIC makes sure both sides stay in agreement.
That’s the architectural upgrade we’re making in this post.
Now let’s walk through how to replace our NGINX Ingress Controller with Application Gateway Ingress Controller and give our AKS environment a proper external front door.
💡 Application Gateway will not run in the AKS cluster but as an Azure Resource forwarding the traffic to our cluster. That will be different compared to what we did in part 2 when we where deploying NGINX.
Deploy Application gateway
With the theory out of the way, it’s time to start building the new front door for our AKS cluster. In this section, we’ll deploy an Azure Application Gateway that will act as the external entry point for all incoming traffic. This gateway will live outside the cluster as a native Azure resource, but it will be tightly integrated with AKS through the Application Gateway Ingress Controller (AGIC). We’ll focus on getting a clean, functional deployment in place, without touching our existing microservices. Think of this as laying down the concrete foundation before we connect any doors or signage, once the gateway exists, we can start teaching it how to route traffic safely into our cluster.
🎬 Open a PowerShell session and run the code below (this will store all variables which we need during the entire blog)
💡 Update the value so they match your environment 😉
$AKS_RG = "az-dev-weu-aks-001"
$AKS_NAME = "bpasaks"
$VNET_NAME = "aks-vnet-38122029"
$VNET_RG = "MC_az-dev-weu-aks-001_bpasaks_westeurope"
$APPGW_SUBNET = "aks-appgateway"
$APPGW_NAME = "appgw-powershellservice"
$LOCATION = "westeurope"You should see the result below:

Gateway preparation and deployment
Before we can deploy the Application Gateway itself, we need to prepare a few supporting Azure resources. The most important one is a new Public IP address that will serve as the external endpoint for our gateway.
Unlike the NGINX ingress controller, which exposed services directly from within the AKS cluster, Azure Application Gateway requires its own dedicated Public IP. This IP represents the front door of our environment, every inbound request from the internet will hit this address first, long before traffic is forwarded to Kubernetes.
We deliberately create a new Public IP instead of reusing anything that AKS already owns. This keeps responsibilities clean and avoids tight coupling between the cluster lifecycle and the gateway. If the cluster is upgraded, recreated, or scaled, the gateway’s external presence remains stable.
💡 Application Gateway only supports Standard or Standard static Public IP SKUs. Dynamic IPs are not supported, so make sure the IP is created as static to prevent unexpected changes to your entry point.
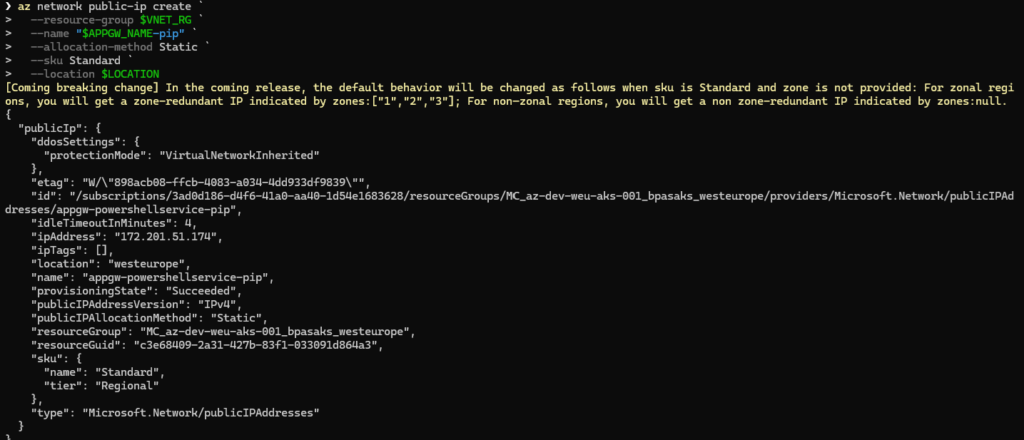
🎬 Run the command below to create a new public IP
az network public-ip create `
  --resource-group $VNET_RG `
  --name "$APPGW_NAME-pip" `
  --allocation-method Static `
  --sku Standard `
--location $LOCATIONYou should see the result below
🎬 Now deploy the application gateway by running the command below:
az network application-gateway create `
  --name $APPGW_NAME `
  --resource-group $VNET_RG `
  --location $LOCATION `
  --sku Standard_v2 `
  --capacity 2 `
  --vnet-name $VNET_NAME `
  --subnet $APPGW_SUBNET `
  --public-ip-address "$APPGW_NAME-pip" `
--priority 100After deploying the application gateway lets store it’s ID so we can use it later on:
$APPGW_ID = az network application-gateway show `
  --name $APPGW_NAME `
  --resource-group $VNET_RG `
  --query "id" -o tsv
You should see the result below:

🎬 Now lets enable the addon for application gateway
Run the command below
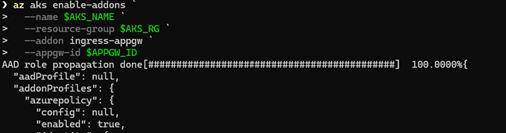
az aks enable-addons `
  --name $AKS_NAME `
  --resource-group $AKS_RG `
  --addon ingress-appgw `
  --appgw-id $APPGW_ID
You should see the result below:
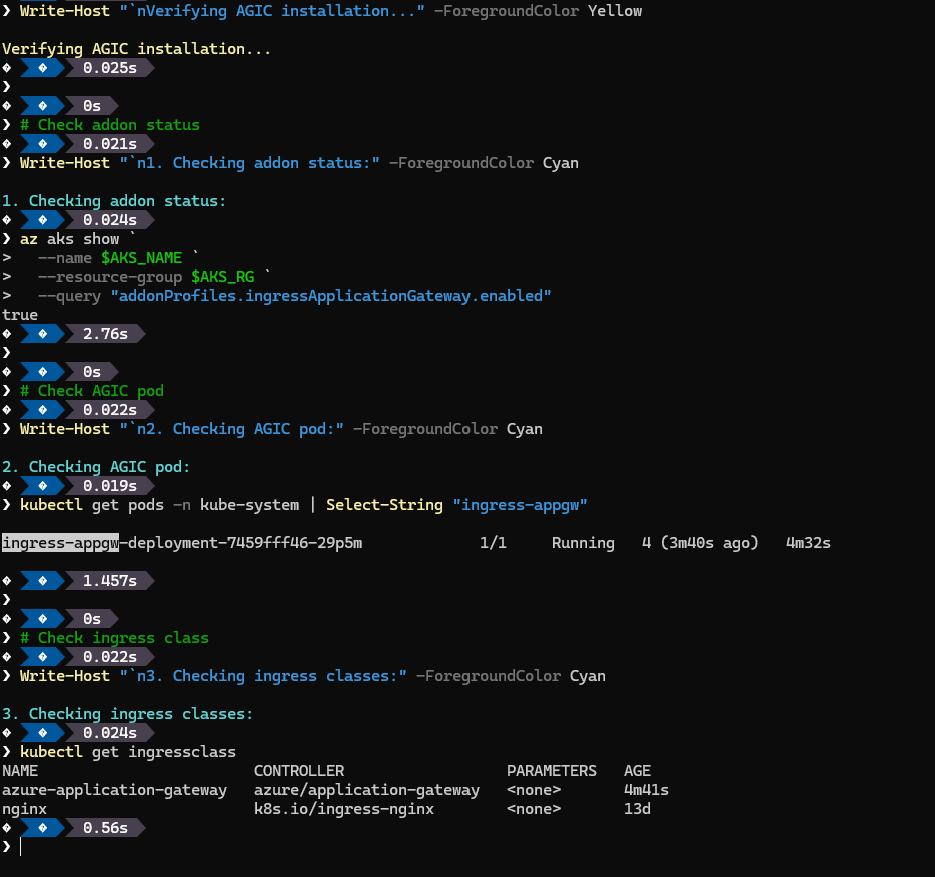
🎬 Now run this to validate everything:
Write-Host "`nVerifying AGIC installation..." -ForegroundColor Yellow

# Check addon status
Write-Host "`n1. Checking addon status:" -ForegroundColor Cyan
az aks show `
  --name $AKS_NAME `
  --resource-group $AKS_RG `
  --query "addonProfiles.ingressApplicationGateway.enabled"

# Check AGIC pod
Write-Host "`n2. Checking AGIC pod:" -ForegroundColor Cyan
kubectl get pods -n kube-system | Select-String "ingress-appgw"

# Check ingress class
Write-Host "`n3. Checking ingress classes:" -ForegroundColor Cyan
kubectl get ingressclassyou should see:
If all steps were followed correctly, we now have a fully deployed and running Azure Application Gateway. At this point, the gateway exists as a standalone Azure resource with its own Public IP, ready to receive inbound traffic from the internet. While it’s not routing anything to our AKS workloads just yet, the foundation is in place. The front door has been built, powered on, and is waiting for instructions. In the next section, we’ll connect this gateway to our AKS cluster using the Application Gateway Ingress Controller, allowing Kubernetes to start defining how traffic should flow inside.
Update HELM
Now that the Application Gateway is up and running, the next step is to teach our AKS cluster how to use it. This is where the Application Gateway Ingress Controller (AGIC) comes into play. AGIC runs inside the cluster and acts as the translator between Kubernetes and Azure Application Gateway.
To deploy AGIC, we’ll use a Helm chart, just like we did earlier in this series for the NGINX ingress controller. However, this chart requires a few important updates compared to the previous setup. Instead of exposing services through a Kubernetes-managed load balancer, we now need to point AGIC to the existing Application Gateway resource we just created.
Overview on what will be changed
| Setting | NGINX | AGIC |
| Ingress Class | nginx | azure-application-gateway |
| Annotations | nginx.ingress.kubernetes.io/* | appgw.ingress.kubernetes.io/* |
| Public IP | 108.141.189.166 | NEW_IP (from Phase 1) |
| SSL Redirect | NGINX handles | App Gateway handles |
🎬 Run the command below to store the freshly created public IP (we need this later on), Don’t forget to update the name so it reflects your own IP 😉
$VNET_RG = "MC_az-dev-weu-aks-001_bpasaks_westeurope"
$APPGW_NAME = "appgw-powershellservice"

$NEW_IP = az network public-ip show `
  --resource-group $VNET_RG `
  --name "$APPGW_NAME-pip" `
  --query "ipAddress" -o tsv

Write-Host "New Application Gateway IP: $NEW_IP" -ForegroundColor Green
Write-Host "New domain will be: demo.$NEW_IP.nip.io" -ForegroundColor Cyan
Updating deployment values
Before deploying the Application Gateway Ingress Controller, we need to update the Helm chart configuration so it knows exactly which Application Gateway to manage and how to authenticate against Azure.
All of this configuration lives in the values.yaml file. This file acts as the contract between Kubernetes and Azure: it tells AGIC where the Application Gateway is located, which subscription and resource group it belongs to, and which identity it should use to apply configuration changes.
At a minimum, we need to update the following values with the details from the gateway we just created:
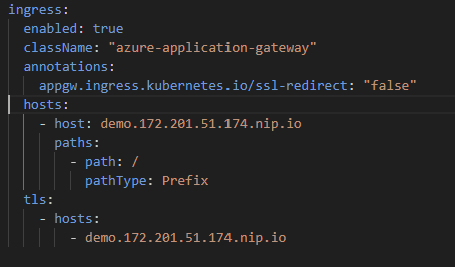
🎬 Now open the values.yaml file and modify these:
Update classname:
ingress:
enabled: true
className: “azure-application-gateway”
Update annotations:
annotations:
appgw.ingress.kubernetes.io/ssl-redirect: “false”
Update hosts:
hosts:
– host: demo.172.201.51.174.nip.io
paths:
– path: /
pathType: Prefix
tls:
– hosts:
– demo.172.201.51.174.nip.io
You should end up with:
🎬Now update the cluster by running the command below
helm upgrade powershellasaservice ./helm/demo-serviceYou should see the result as shown below

Checking and testing!
With AGIC deployed and our values.yaml updated, it’s time to verify that everything is working as expected. At this stage, the Application Gateway should be fully aware of our Kubernetes ingress resources and ready to route traffic. We can start by checking the AGIC logs in the cluster to ensure it has successfully connected to the gateway and is synchronizing configuration changes. Next, a simple test is to access our microservices using the Public IP or DNS name of the Application Gateway, requests to / should reach the frontend, and requests to /api should hit the API service. If all responses come back correctly over HTTPS, we know the front door is functioning, and the external traffic flow is now fully managed by the gateway instead of NGINX.
🎬 Run the commands below
kubectl get podsYou should see the result:

kubectl get ingress
Testing
Now open a browser and go to the IP (dont forget to update it 😉):
http://demo.172.201.51.174.nip.io/api/demo
You should be welcomed by the PowerShell service:

😉 Great, now our traffic follows the application gateway instead of NGINX and is capable on reaching and communicating with our service!
Summary
We didn’t magically make traffic appear, we didn’t instantly turn into Kubernetes routing gurus, and we definitely didn’t convince the internet to bow to our containerized PowerShell…
But what we did do is take a significant step forward: we made our PowerShell microservices reachable from the outside world in a clean, secure, and Azure-native way. Here’s what you walk away with:
🎯 A modern, external-facing ingress
Your AKS cluster now has a proper front door with Azure Application Gateway. NGINX is out, AGIC is in! Handling incoming requests, enforcing HTTPS, and keeping the cluster itself safely behind the perimeter.
PowerShell answered from inside AKS, and you saw the full traffic path working exactly as intended.
🎉 The big picture
This was more than a deployment exercise, it’s an architectural upgrade. You’ve moved responsibility outward: security, TLS, and traffic management now live at the cluster perimeter, leaving Kubernetes to focus purely on workloads.
Next up?
🔥 Scaling multiple services behind one Application Gateway
🔥 Advanced routing, path-based rules, and TLS patterns
🔥 Building a more modular, production-ready PowerShell microservice architecture
Stay tuned… the adventure is still not over! 😉