

Imagine this. You run one command. A PowerShell agent wakes up, logs into your Azure subscription, pulls every resource it can find, feeds them to an AI model, and gets back a structured diagnosis. Not a wall of text. Not “you might want to consider looking into…” No. A prescription. A list of exact actions, ranked by severity, with the PowerShell commands to fix them. And then, if you let it, it executes them.
That’s what we’re building today. I call it CloudDoc.
This is a practical and straightforward example to implement. While we won’t cover every aspect like ‘awareness’ and ‘intent validation,’ the basics are well addressed.
Throughout this post, you’ll see the 🎬 icon, this signals an action step to help you get the most out of the content.
Additionally, the 📒 icon highlights sections that dive into the technical details relevant to this post.
I hope you’re ready, this is going to be exciting! 😁
The idea
So, just some ‘scratchy’ code (note; this doesn’t work of course 😆) but the idea will be a bit like below
Invoke-CloudDoc -SubscriptionId "your-sub-id"

# Output:
# DIAGNOSIS COMPLETE - 4 findings
#
# [CRITICAL] Web App 'api-prod' has no backup configured
#   Rx: Enable backup with 7-day retention
#   Command: Set-AzWebApp ...
#   Auto-fix: YES
#
# [HIGH] Storage account 'logstorage01' allows public blob access
#   Rx: Disable public access
#   Command: Set-AzStorageAccount -AllowBlobPublicAccess $false
#   Auto-fix: YES
#
# Apply all auto-fixes? [Y/N]The Prescription Schema
Every skilled and effective doctor relies on a well-established standard form to guide their work and ensure consistency. CloudDoc follows this same principle closely. Below is the detailed schema that compels the AI to process information carefully and think critically in terms of actionable findings that can be used to improve patient care and outcomes:
$diagnosisSchema = @{
    type       = "object"
    properties = @{
        summary = @{
            type       = "object"
            properties = @{
                totalResources = @{ type = "integer" }
                healthScore    = @{ type = "integer" }
                status         = @{ type = "string"
                    enum = @("healthy", "at-risk", "critical") }
                headline       = @{ type = "string" }
            }
            required             = @("totalResources", "healthScore",
                                     "status", "headline")
            additionalProperties = $false
        }
        findings = @{
            type  = "array"
            items = @{
                type       = "object"
                properties = @{
                    resource     = @{ type = "string" }
                    resourceType = @{ type = "string" }
                    severity     = @{ type = "string"
                        enum = @("critical","high","medium","low") }
                    category     = @{ type = "string"
                        enum = @("security","reliability","cost",
                                 "performance","compliance") }
                    diagnosis    = @{ type = "string" }
                    prescription = @{ type = "string" }
                    autoFixable  = @{ type = "boolean" }
                    fixCommand   = @{ type = "string" }
                }
                required = @("resource","resourceType","severity",
                    "category","diagnosis","prescription",
                    "autoFixable","fixCommand")
                additionalProperties = $false
            }
        }
    }
    required             = @("summary", "findings")
    additionalProperties = $false
}
This schema provides our doctor with precise instructions on how to operate and exactly how it should respond when we make our calls. Notice how there is no plain text involved here, giving us the freedom to add whatever information we want, exactly where we want it, without any limitations!
🎬 Save the schema above as ‘CloudDocSchema.ps1’ we’ll need it later on for getting the diagnosis
A brief trip down memory lane: (I’m getting a bit sentimental here) my very first blog posts about PowerShell focused on structuring data, creating objects, and embracing the concept of thinking in an ‘object-oriented’ way. Even today, these ideas remain highly relevant, perhaps even more important than you might initially expect.
This is crucial because simple text responses can completely undermine automation efforts and make processes inefficient!
Notice what’s happening here. We’re not asking the AI to just “be helpful.” We’re specifying exactly how its brain should work. Every finding includes a severity enum (no new levels), a category, and importantly autoFixable and fixCommand. The AI must decide: can this be fixed automatically, and if yes, what’s the command?
That’s the difference between a chatbot and an agent. A chatbot says “you might want to check this.” An agent says “here’s the fix, want me to apply it?”
Scanning
As Azure is our patient, we need to approach the situation just like every good doctor would in a clinical setting. It is essential that we thoroughly examine our patient, taking the time to carefully check him or her from head to toe. We must also perform a comprehensive scan to gather all the critical information available. This detailed data collection is crucial because it provides us with the insights we need to make an accurate and well-informed diagnosis.
So how exactly are we going to approach this task? Well, the key is to keep things straightforward and uncomplicated! We’ll be utilizing the Get-AzResource cmdlet, which is a powerful and efficient way to retrieve Azure resources. To make our search more focused and manageable, we’ll specifically target a particular resource group as well as a designated subscription. This approach helps us narrow down the scope and avoid retrieving an overwhelming amount of data 😉
⚠️ The Get-AzResource cmdlet is the primary tool we’ll rely on to fetch the resources. Before proceeding, please ensure that you have all the necessary modules and dependencies installed on your system. Note that this blog post will not cover the installation process or setup instructions for these tools, so please make sure everything is ready to go beforehand.
🎬 Time to shine PowerSheller! Follow the steps below for our ‘analysis’ tool
- Copy the code below and save it somewhere on your filesystem
function Get-AzureSnapshot {
    param(
        [Parameter(Mandatory = $true)]
        [string]$SubscriptionId,

        [Parameter(Mandatory = $true)]
        [string]$ResourceGroupName
    )

    Set-AzContext -SubscriptionId $SubscriptionId | Out-Null

    $resources = Get-AzResource -ResourceGroupName $ResourceGroupName |
        Select-Object Name, ResourceGroupName, ResourceType, Location, Tags

    $storageAccounts = Get-AzStorageAccount -ResourceGroupName $ResourceGroupName -ErrorAction SilentlyContinue |
        Select-Object StorageAccountName, ResourceGroupName,
            AllowBlobPublicAccess, MinimumTlsVersion, EnableHttpsTrafficOnly

    return @{
        Resources       = $resources
        StorageAccounts = $storageAccounts
    } | ConvertTo-Json -Depth 10
}So we’ll be just using this piece of code to get whatever we need. We’ll not do anything exiting here.
But, it is good to test the function before continuing.
- Test the script like above (I saved it on my system as ‘analysis.ps1’)
⚠️ Make sure you are logged in to an Azure account before continuing
- Run commands below (we need to dot source it before we can run the function)
. .\Analysis.ps1And than run the script with the command below (make sure you provide the correct subscriptionid and resourcegroupname)
Get-AzureSnapshot

cmdlet Get-AzureSnapshot at command pipeline position 1
Supply values for the following parameters:
SubscriptionId: xxxxxxxxx-dae4-4390-a0df-xxxxxxxxxxxxxxxx
ResourceGroupName: xxxxxxxxxxxxxxYou should be presented with the result of the resourcegroup:

Diagnose
Every skilled and competent doctor must have the ability to accurately provide a diagnosis, and the same principle applies to our specialized cloud doctor as well.
⚠️ I assume you already have an Azure foundry deployed with a deployment model. If you haven’t please check out the previous blogs about PowerShell and AI
So let’s get stared, let’s make that diagnose!
🎬 Follow the steps below to make the diagnosis
- Open a PowerShell session and start dot sourcing the schema by running the command below
. .\CloudDocSchema.ps1- This makes sure that the current session has our schema loaded
- Now run the command below so we have the diagnose script in the session
- Store the code below in a file ‘Diagnose.ps1’ (as this will be our doctor doing the diagnosis)
function Invoke-Diagnosis {
    param([string]$Snapshot, [hashtable]$Schema)

    $Endpoint   = 'https://xxxxxxxxxxxxxx.openai.azure.com/'
    $Deployment = 'AzureDoctor'
    $ApiKey     = 'xxxxxxxxxxxxxxxxxxxxxxxxxxxxxxx'

    $body = @{
        messages = @(
            @{
                role    = "system"
                content = @"
You are CloudDoc, an Azure infrastructure diagnostic agent.
You receive a snapshot of Azure resources and produce a
medical-style diagnosis.
"@
            }
            @{
                role    = "user"
                content = "Diagnose this Azure environment:`n$Snapshot"
            }
        )
        max_tokens      = 2000
        response_format = @{
            type        = "json_schema"
            json_schema = @{
                name   = "azure_diagnosis"
                strict = $true
                schema = $Schema
            }
        }
    } | ConvertTo-Json -Depth 20

    $headers  = @{ "api-key" = $ApiKey
                   "Content-Type" = "application/json" }
    $url      = "$Endpoint/openai/deployments/$Deployment/" +
               "chat/completions?api-version=2024-10-21"
    $response = Invoke-RestMethod -Method Post -Uri $url -Headers $headers -Body $body

    return $response.choices[0].message.content | ConvertFrom-Json
}- Now dot source the doctor
. .\Diagnose.ps1- Time to run the analysis.ps1 file so we can make an analysis of our patient (make sure to provision the correct subscription and resource group afterwards)
. .\Analysis.ps1
$snapshot = Get-AzureSnapshot- And run the Diagnosis (we dont need a snapshot, this would be usefull for only targeting specific resources
$diagnosis = Invoke-Diagnosis -Snapshot $Snapshot -Schema $diagnosisSchema📒 This might take some time, as all good doctors need to, to have a proper diagnose 😉
In the end you will be presented with the outcome in the variable ‘diagnosis’ which you can query afterwards!
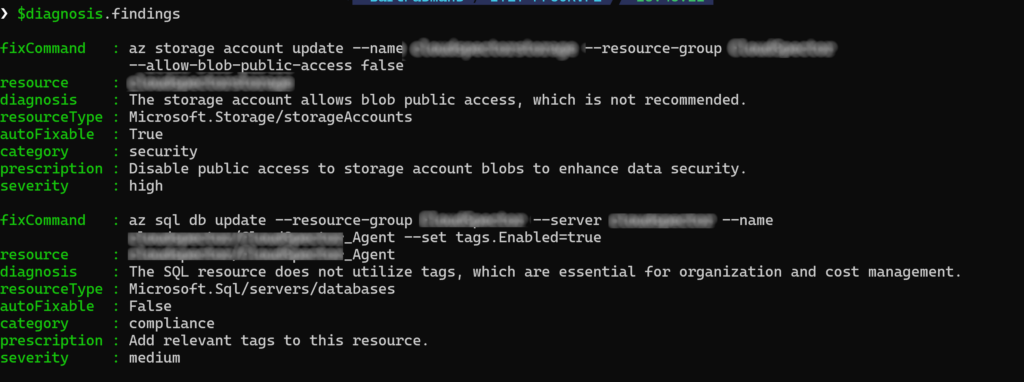
- Now run the command below to see what the doctor found!
$diagnosis.findingsIf everything worked as expected the doctor should now have a diagnose! (and a prognose 😆), don’t forgot to listen what the doctor has to say.. he might just be right.
Now that the doctor has made a diagnose we can find the required medicine to heal our patient, but… that’s for our next blog!
Summary
We’ve built CloudDoc, a PowerShell-driven “cloud doctor” that scans an Azure subscription, gathers all resources, and sends them to an AI model for structured analysis. Instead of vague feedback, it produces a strict JSON diagnosis: a health score, overall status, and a ranked list of findings. Each finding includes severity, category, a clear diagnosis, a concrete prescription, and, when possible, a ready-to-run PowerShell command to fix it automatically.
To make this possible, we defined a strict schema that forces the AI to think in structured, actionable terms. We then used an Azure resource snapshot function to collect real environment data, and connected everything to an Azure OpenAI deployment that returns consistent, machine-readable output instead of free-form text.
Finally, we ran the full flow end-to-end: from subscription scan, to snapshot generation, to AI diagnosis, and ended up with a structured set of findings that can be queried and acted on directly in PowerShell.
Now that we’ve successfully built the agent and confirmed it can diagnose an Azure environment, the next step is to take those findings and turn them into real remediation logic, where CloudDoc doesn’t just prescribe fixes, but actually applies them safely.
On to the next one folks! And some advise from the doctor; have some fun doing doing automation!