
Welcome back all! After my previous blog about my session at Experts Live it’s time to pick up where we left in the AI journey combined with PowerShell (of course) 😉 Hence today we’ll be focusing on something else than just ‘plain-text’. Today we’ll be diving into something I found quite interesting which is image recognition! Why? Well, because I had the Idea of ‘What if an error occurs and I can just screenshot it and AI will look for a fix).
No involvement of MCPs, Tools, or other stuff, just straight forward image recognition and providing guidance.
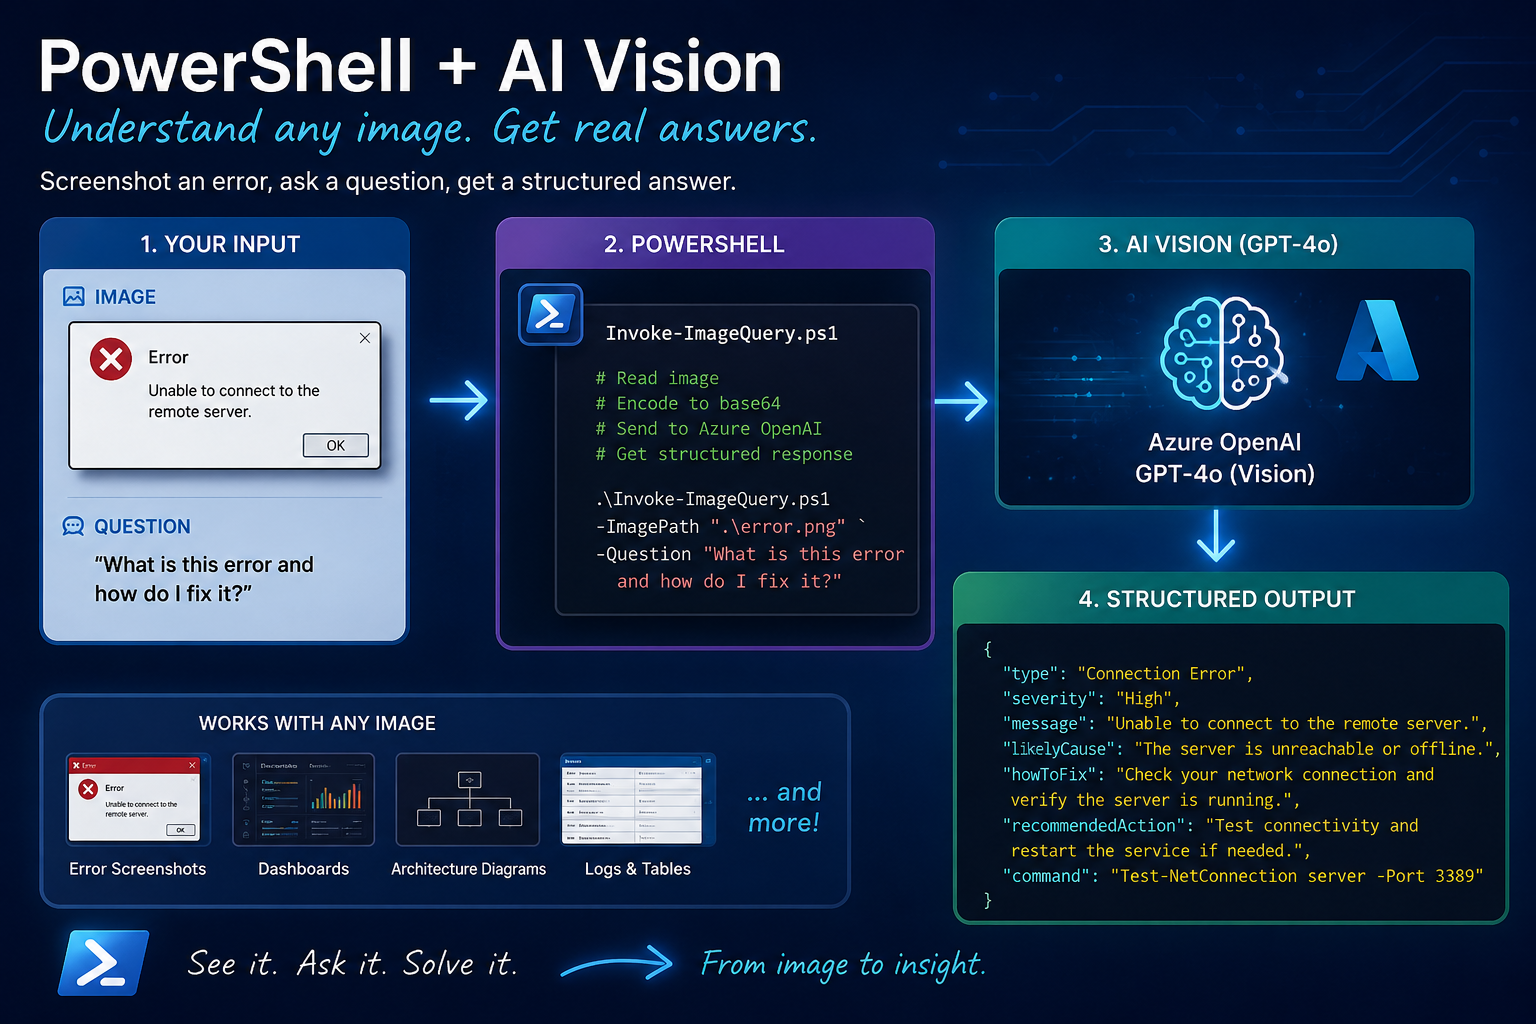
That’s what we’re building today. A PowerShell function that takes any image, a screenshot, an error dialog, a dashboard, an architecture diagram encodes it, sends it to Azure OpenAI with GPT-4o’s vision capability, and gets an actual useful answer back. And yes, we’re combining it with structured output because I’m apparently incapable of accepting free-text responses from an AI anymore
🎬 Action steps are marked with this icon.
📒 Technical deep-dives are marked with this icon.
What We’re Building
The idea is dead simple. You have an image. You have a question. You get an answer:
. .\Invoke-ImageQuery.ps1

Invoke-ImageQuery -ImagePath ".\error-screenshot.png" `
-Question "What is this error and how do I fix it?"And with structured output!
Clean objects. Error classified, severity assigned, root cause identified, fix provided, and even the command to run. Not “based on what I can see in the image, it appears that…”, just the data.
Two scripts handle everything:
| File | What it does |
| Invoke-ImageQuery.ps1 | Encodes an image and sends it to Azure OpenAI with your question |
| ImageQuerySchema.ps1 | Schemas for screenshots, errors, and diagrams |
How GPT-4o Sees Images
Before we write any code, a quick explanation of how this actually works. GPT-4o is a multimodal model it processes both text and images natively. Not as separate systems stitched together, but as one model that understands both.
The API accepts images in the user message as base64-encoded data URIs. So instead of just sending text like we did with the PDF analyzer, we send a message that contains both an image and a question. The model looks at the image, reads the question, and responds.
📒 DEEP DIVE: The detail parameter controls how the model processes the image. Set it to “high” and the model uses more tokens to analyze the image at full resolution, better for screenshots with small text or complex diagrams. Set it to “low” and it uses a fixed 512×512 thumbnail, faster and cheaper, but you lose detail. For our use case we want “high” every time.
The Agent
As you might have seen in the previous blogs we need something to take care of our request. Hence we’ll need to create some sort of code which takes care of our input, forwards it to AI and does something with the response which we get back.
🎬Follow the steps below to create the code required for communicating with the AI model
- Create a file ‘Invoke-ImageQuery.ps1’ and provide it with the content below (make sure you update the variables ‘endpoint’, ‘deployment’ and ‘apikey’
function Invoke-ImageQuery {
    param(
        [Parameter(Mandatory)]
        [string]$ImagePath,

        [Parameter(Mandatory)]
        [string]$Question,

        [hashtable]$Schema
    )

    $Endpoint   = 'https://your-endpoint.openai.azure.com/'
    $Deployment = 'your-deployment'
    $ApiKey     = 'your-api-key'

    if (-not (Test-Path $ImagePath)) {
        throw "Image not found: $ImagePath"
    }

    $extension = [System.IO.Path]::GetExtension($ImagePath).TrimStart('.').ToLower()
    $mimeMap = @{
        png  = "image/png"
        jpg  = "image/jpeg"
        jpeg = "image/jpeg"
        gif  = "image/gif"
        bmp  = "image/bmp"
        webp = "image/webp"
    }

    $mimeType = $mimeMap[$extension]
    if (-not $mimeType) {
        throw "Unsupported image format: $extension"
    }

    Write-Host ""
    Write-Host "  Reading image..." -ForegroundColor Cyan
    $imageBytes = [System.IO.File]::ReadAllBytes(
        (Resolve-Path $ImagePath))
    $base64 = [Convert]::ToBase64String($imageBytes)
    $dataUri = "data:$mimeType;base64,$base64"
    Write-Host "  Image loaded: $extension, $([math]::Round($imageBytes.Length / 1KB)) KB" -ForegroundColor DarkGray

    Write-Host "  Querying AI..." -ForegroundColor Cyan

    $body = @{
        messages = @(
            @{
                role    = "system"
                content = @"
You are a visual analysis assistant.
You receive an image and a question about it.
Describe what you see accurately and answer the
question based ONLY on the image content.
If something is unclear or not visible, say so.
Do not guess or make up information.
"@
            }
            @{
                role    = "user"
                content = @(
                    @{
                        type      = "image_url"
                        image_url = @{
                            url    = $dataUri
                            detail = "high"
                        }
                    }
                    @{
                        type = "text"
                        text = $Question
                    }
                )
            }
        )
        max_tokens = 2000
📒 DEEP DIVE: The content array is the key difference from text-only APIs. In the PDF blog, we sent a single string as the user message. Here, the user message content is an array with two elements: the image and the question. This is how the vision API works, you mix image and text blocks in the same message.
Base64 encoding is straightforward in .NET. [System.IO.File]::ReadAllBytes() reads the raw bytes, [Convert]::ToBase64String() turns them into a base64 string, and we wrap it in a data:image/png;base64,… URI. The model knows how to decode this.
The MIME type matters. You can’t just send raw base65, the API needs to know if it’s a PNG, JPEG, or something else. The $mimeMap hashtable handles the lookup.
ConvertTo-Json -Depth 20 returns once more. I’m serious, this will keep haunting every blog until PowerShell fixes the default. The nested content array with image_url objects makes this even more critical than before, we don’t want to keep running into deserialization in-depth errors….
The Schemas
Three distinct schemas designed specifically for a variety of different scenarios, each tailored to meet unique requirements and contexts.
🎬 Create the schema below (we’ll do everything in one file now to ease up the process) save it as ‘ImageQuerySchema.ps1’
$screenshotSchema = @{
    type       = "object"
    properties = @{
        application = @{ type = "string" }
        description = @{ type = "string" }
        elements    = @{
            type  = "array"
            items = @{ type = "string" }
        }
        errors      = @{
            type  = "array"
            items = @{ type = "string" }
        }
        suggestions = @{
            type  = "array"
            items = @{ type = "string" }
        }
    }
    required             = @("application", "description", "elements", "errors", "suggestions")
    additionalProperties = $false
}

$errorSchema = @{
    type       = "object"
    properties = @{
        errorType   = @{
            type = "string"
            enum = @("configuration", "authentication", "network", "permission", "runtime", "resource", "unknown")
        }
        severity    = @{
            type = "string"
            enum = @("critical", "high", "medium", "low")
        }
        message     = @{ type = "string" }
        rootCause   = @{ type = "string" }
        fix         = @{ type = "string" }
        command     = @{ type = "string" }
    }
    required             = @("errorType", "severity", "message", "rootCause", "fix", "command")
    additionalProperties = $false
}

$diagramSchema = @{
    type       = "object"
    properties = @{
        diagramType = @{
            type = "string"
            enum = @("architecture", "network", "flow", "sequence", "deployment", "other")
        }
        title       = @{ type = "string" }
        components  = @{
            type  = "array"
            items = @{ type = "string" }
        }
        connections = @{
            type  = "array"
            items = @{ type = "string" }
        }
        summary     = @{ type = "string" }
    }
    required             = @("diagramType", "title", "components", "connections", "summary")
    additionalProperties = $false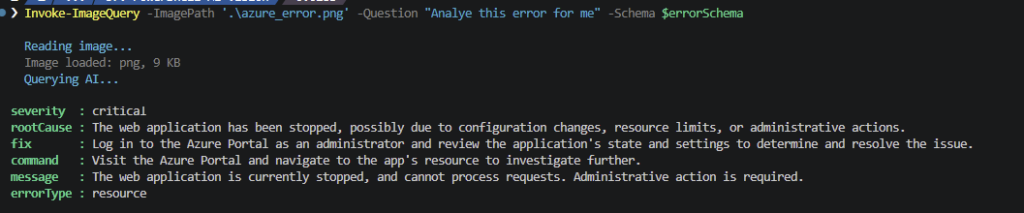
}📒 DEEP DIVE: The $errorSchema is the one I’m most excited about. It forces the AI to classify the error type, assign severity, identify root cause, suggest a fix, and even propose a command to run. That command field is powerful, instead of the AI saying “you should update your configuration,” it gives you the actual command. Copy, paste, done.
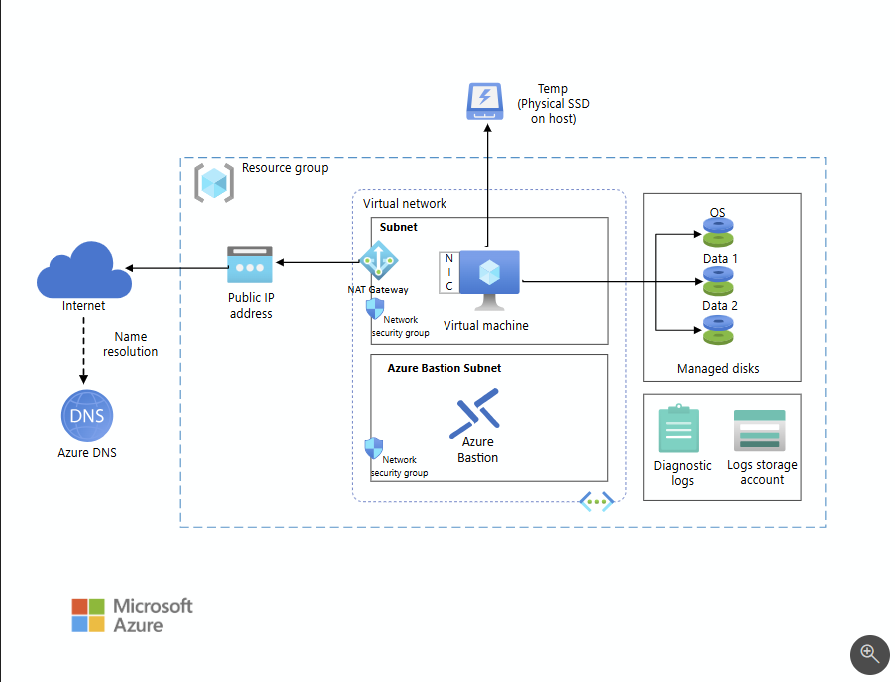
The $diagramSchema is for architecture diagrams. The AI identifies every component, maps out connections, classifies the diagram type, and gives you a summary. I’ve used this on draw IO exports from colleagues and it saves a good fifteen minutes of squinting at arrows.
Feel free to play around with this and create your own schemas for it see how you can enhance it to fit your own goal!
Practical example
🎬 Let’s start playing around with what we have this far. We’ll be using the AI to analyze images based on the schemas we’ve defined.
- Start by dot sourcing the required files into your PowerShell session
. .\Invoke-ImageQuery.ps1
. .\ImageQuerySchema.ps1Analyzing an error
So let’s start by analyzing the most annoying thing there is, errors! For this I’ll just google a short error and use that as input for our script. (you can use the same as I have below or use one on your own). I’ll be using an Azure web app stopped error (saved as file in the same directory as the script and schema)

- Now let’s run the analyzer
Invoke-ImageQuery -ImagePath '.\azure_error.png' -Question "Analye this error for me" -Schema $errorSchemaAnd you should be getting the result back from the AI model, and put in the correct context of our agent:
Understanding an architectural diagram
So next one on the radar; we’ll be analyzing an architectural diagram. (I just googled one) so you can either use mine or use one of your own.
- Now let’s run the analyzer
Invoke-ImageQuery -ImagePath '.\azure_diagram.png' -Question "Analye this diagram for me" -Schema $diagramSchemaAnd you should be getting the result back from the AI model, and put in the correct context of our agent:

Batch analyzing
So we have two screenshots now in the directory (diagram and error) if we had more we wouldn’t want to analyze one-by-one so we’ll be using a batch for that. You can easily do this by just iterating over the files in the directory and sending them to AI.
- Run the code below (from the directory where your files are)
$images = Get-ChildItem -Include *.png, *.jpg -Recurse

$results = foreach ($img in $images) {
    Write-Host "Analyzing: $($img.Name)" -ForegroundColor Cyan
    $analysis = Invoke-ImageQuery -ImagePath $img.FullName `
        -Question "Describe this screenshot" `
        -Schema $screenshotSchema

    [PSCustomObject]@{
        File        = $img.Name
        Application = $analysis.application
        Errors      = $analysis.errors.Count
    }
}

$results | Format-Table -AutoSize
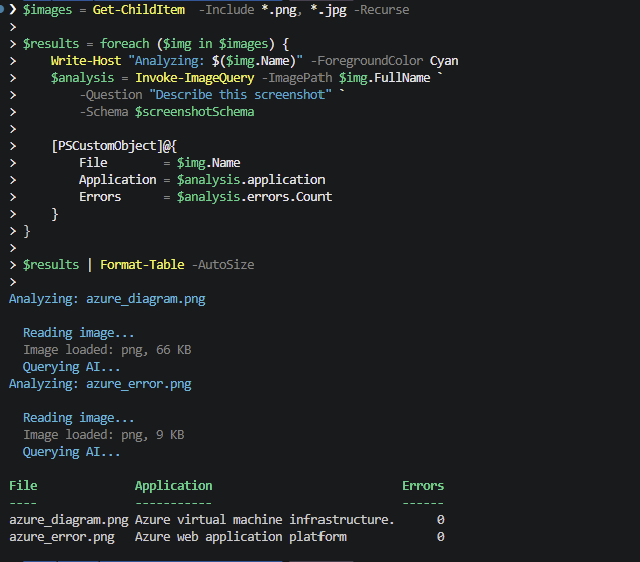
See how it described the application? There are no errors in the context of the schema but the AI model is well capable on analyzing the content, putting everything back to our schema and telling us what’s in there.
Image Size and Token Costs
Vision requests are more expensive than text-only requests. When you send an image with detail: “high”, GPT-4o splits it into 512×512 tiles and each tile costs tokens. A 1920×1080 screenshot results in roughly 8 tiles that’s about 1,200 tokens just for the image.
For a single screenshot analysis, that’s fine, fractions of a cent. But if you’re batch-processing 200 screenshots, the costs add up.
Keep image sizes reasonable. A 4K screenshot is overkill for most error messages. Resize or crop to the relevant area before sending.
Use detail: “low” for simple images. If you just need to know “is this a green checkmark or a red X” you don’t need high-resolution analysis.
Security Note
Your images get sent to Azure OpenAI. Screenshots can contain sensitive information, email addresses, internal URLs, credentials, customer data. Make sure you’re comfortable with that before sending screenshots of production systems.
The API key is hardcoded. Same story as always. Key Vault for production. Hardcoded for personal scripting. Don’t commit to public repos.
Sneak preview
So during the creation of this blog I got some inspiration for an open source initiative. In the next blog more about this. Stay tuned!
Wrapping it up
Two scripts. That’s all it takes to give your PowerShell session eyes.
Invoke-ImageQuery handles the mechanics, reading the image, base64 encoding, building the multimodal API request etc. ImageQuerySchema gives you structured analysis error classification, diagram parsing, screenshot triage.
The structured output on top of vision is what makes this actually useful for automation. When the AI returns errorType: “authentication” and severity: “critical”, your script can route that to the right team. When it returns diagramType: “network” with a list of components, you can compare it against your CMDB. It’s not just a description it’s data you can work with.
Last blog we taught PowerShell to read documents. Now it can see. Next time we might have to teach it to listen 😁
So stay tune for the upcoming initiative, and keep scripting!